How to Make an Origami Envelope: A Simple & Stunning DIY Guide
Forget expensive stationery or last-minute scrambles for an envelope! With just a single square piece of paper and a few minutes, you can create beautiful, functional origami envelopes. These charming folded creations are perfect for gift cards, love notes, party invitations, seeds, or adding a personal touch to any small gift. They’re surprisingly easy to make, eco-friendly, and endlessly customizable. Let’s dive into the art of folding your own unique origami envelope.
Why Choose Origami Envelopes?
- Instant & Affordable: Made with paper you likely already have (printer paper, scrapbooking paper, even magazine pages!).
- Eco-Conscious: Reduce waste by repurposing paper or using recycled materials.
- Unique & Personal: Express your creativity with patterns, colors, and decorations.
- Versatile: Suitable for countless occasions – birthdays, holidays, thank-yous, or just because.
- Satisfying Fun: Experience the calming, rewarding feeling of creating something with your hands.
Materials You’ll Need:
- 1 Square Piece of Paper: The foundation! Standard origami paper (15cm x 15cm / 6in x 6in) is ideal, but any square paper works.
- Beginner Tip: Use slightly larger paper (20cm x 20cm / 8in x 8in) for easier handling.
- Paper Weight: Light to medium weight paper (like standard printer paper or origami paper) folds best. Avoid cardstock for your first try, as it can be tricky to crease sharply. Thinner decorative papers work beautifully too!
- Flat Surface: A table or desk provides a stable folding base.
- (Optional but Helpful):
- Bone Folder or Ruler: For making sharp, crisp creases.
- Pencil (Very Lightly): To mark the center point if needed (usually not necessary).
- Glue Stick or Double-Sided Tape: For securing the final flap more permanently (the fold usually holds well).
Where to Buy?
🛒 Get the Best Deal on Amazon:
Step-by-Step Instructions: The Classic Origami Envelope
Step 1
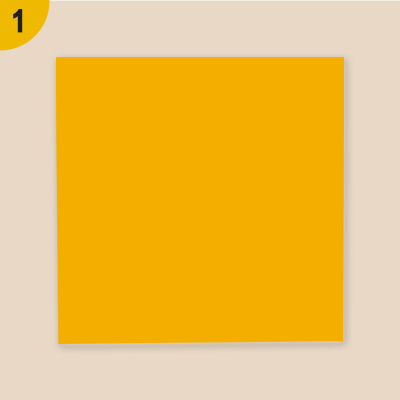
Start with a square sheet of paper. I am using an 8×8-inch origami paper.
Step 2
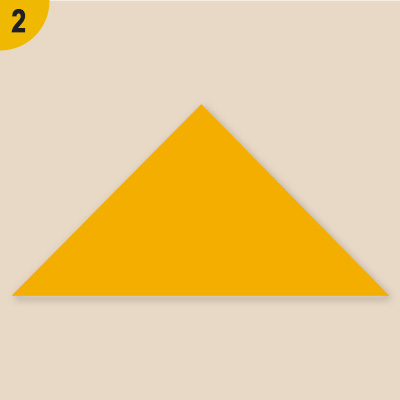
Fold the bottom half to the top half to make a triangle.
Step 3
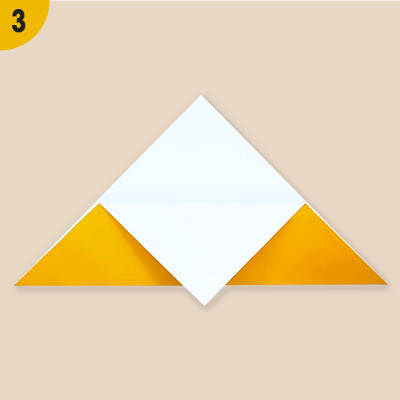
Fold the top corner of the triangle to the bottom edge.
Step 4
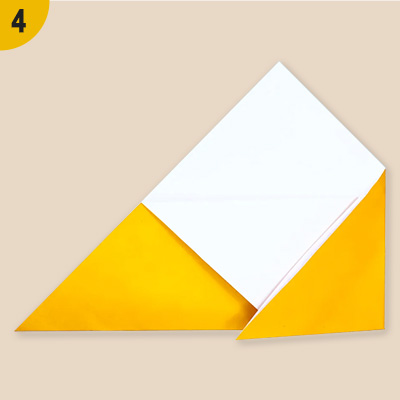
Fold in 1/3rd of the right side of the triangle.
Step 5
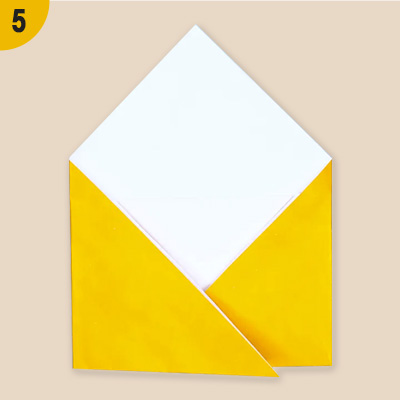
Fold in the left side of the triangle.
Step 6
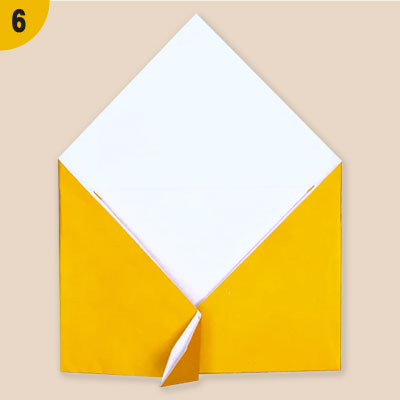
Fold that flap out to the edge and open it slightly.
Step 7
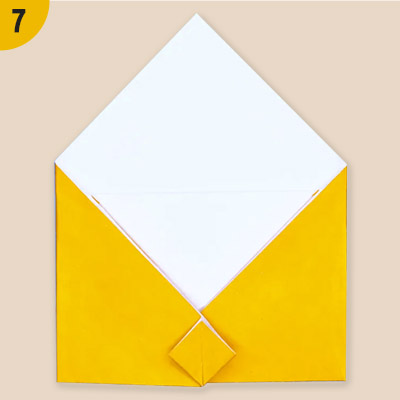
Squash the flap to form a diamond pocket.
Step 8
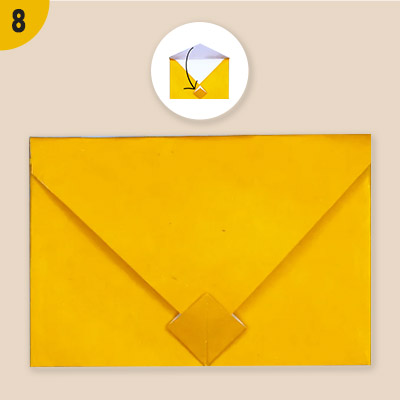
Fold down the top and suck the tip into the diamond-shaped pocket.
Step 9
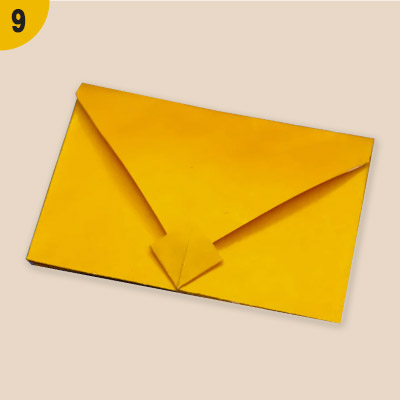
All done! You can write a note and stuff it in the envelope. Run your finger or a bone folder along the edges for a crisp, finished look.
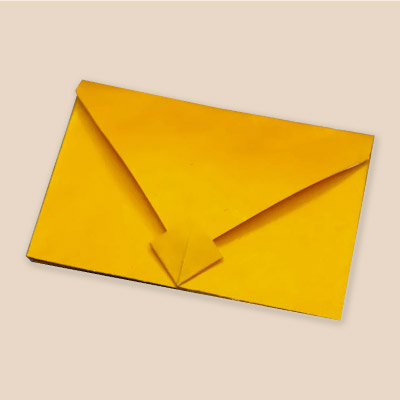
* Congratulations! Your classic origami envelope is complete!
Pro Tips for Perfect Origami Envelopes:
- Crisp Creases are Key: Take your time making sharp, well-defined creases. This makes the envelope neater and helps it hold its shape. Use a ruler or bone folder.
- Mind Your Paper: Heavier paper makes a sturdier envelope but can be harder to fold precisely. Thinner paper is easier to fold but might be less durable. Experiment!
- Size Matters: Remember, the final envelope will be roughly half the width and half the height of your original square paper. Choose your starting size based on what you want to put inside (e.g., a standard gift card usually fits perfectly in an envelope made from 15cm/6in origami paper).
- Decorate! Unleash your creativity:
- Before Folding: Use patterned origami paper, decorative scrapbook paper, or even hand-paint plain paper.
- After Folding: Add stickers, washi tape along the edges, small drawings, rubber stamps, or even a wax seal over the closure flap.
- Personalize: Write the recipient’s name directly on the front, or add a small label.
- Experiment with Closures: Instead of just tucking the flap, punch a small hole through the flap and the body and thread a ribbon or string through, tying it in a bow. Use a decorative sticker to seal it.
- Double-Sided Delight: Use paper that’s decorative on both sides for an envelope that looks beautiful inside and out.
- Make it Functional: For mailing (though not as secure as standard envelopes), reinforce the flap closure well with tape and ensure your address label is securely attached. Note: Very lightweight paper might not be suitable for postal systems.
Creative Variations & Uses:
- Mini Envelopes: Use tiny origami paper (7.5cm / 3in) for adorable notes or jewelry gifts.
- Oversized Envelopes: Use large scrapbook paper (30cm / 12in or more) for holding photos, small flat gifts, or special certificates.
- Seed Packets: Fill with flower or herb seeds – a perfect eco-friendly party favor or gift.
- Money Envelopes: A unique way to give cash or a check.
- Gift Card Holders: Much more personal than the plastic store version!
- Table Place Cards: Fold small envelopes, write the guest’s name on the flap, and tuck a personalized message or small favor inside.
- Advent Calendar: Make 24 small envelopes and number them, filling each with a tiny treat or message.
- Recycled Paper: Use maps, sheet music, book pages, or colorful magazine spreads for truly unique and sustainable envelopes.
- Pattern Play: Combine different folding techniques or add extra folds for more complex envelope designs once you’ve mastered the classic.
Troubleshooting Common Issues:
- Envelope Won’t Stay Closed: Ensure you tucked the flap tip firmly under the top point. Fold the closure flap a little longer if needed. Use glue or tape.
- Creases Aren’t Sharp: Press harder along the fold lines. Use a tool like a bone folder or the edge of a ruler.
- Paper Tears: You might be creasing too aggressively, or the paper might be too thin/dry. Try slightly heavier paper and be gentler, especially on reverse folds.
- Envelope Looks Crooked: Pay close attention to aligning points to the center and edges in Steps 3, 4, and 5. Refold carefully.
- Item Doesn’t Fit: Remember the size limitations! Make your starting square larger next time. Measure your item first.
FAQs:
- Do I need special origami paper?
- No! While origami paper is convenient and comes in great colors/patterns, any square paper works – printer paper, scrapbook paper, even magazine pages or old wrapping paper cut into a square.
- Can I mail an origami envelope?
- You can, but with caveats. Use slightly heavier paper, reinforce the closure well with tape (especially the flap), and ensure addresses are clear and securely attached. It might not be as durable or weather-resistant as a standard envelope, so use it for light items and within reliable postal systems.
- What’s the best paper weight?
- Light to medium weight (around 70-100 gsm) is ideal. Standard printer paper (80 gsm) or genuine origami paper works perfectly. Avoid very thin tissue paper or very thick cardstock for the classic fold.
- How do I make different sized envelopes?
- Simply start with a larger or smaller square! The finished envelope size is proportional to your starting paper. A 15cm square makes an envelope roughly 7.5cm x 10.5cm (perfect for gift cards). A 20cm square makes a more letter-sized envelope.
- My envelope flap is too short/long. How do I fix it?
- In Step 6, adjust how far down you fold the tip. Folding it down further makes a longer flap that might tuck more securely or allow for more decoration. Folding it down less makes a shorter flap. Experiment on a practice piece!
Embrace the Fold!
Making origami envelopes is a simple, rewarding, and practical skill. Once you master the basic fold (which you likely just did!), you’ll find yourself reaching for a square of paper whenever you need something special to hold a small treasure. It combines mindfulness, creativity, and function in one delightful package. So gather your paper, find a flat surface, and start folding your way to beautiful, handmade envelopes that are sure to impress! Share your creations – the personal touch truly makes them special. Happy folding! How to Make an Easy Origami Envelope