How To Make An Easy Origami Parrot: 12 Step-by-Step Instructions
Origami is a timeless Japanese art of paper folding that transforms a simple piece of paper into intricate, elegant designs. Among the most popular and vibrant animals to create with origami is the parrot. If you’re a beginner or looking for a fun craft project, this guide on how to make an easy origami parrot in 12 simple steps is just what you need.
With just a square piece of paper and a little patience, you can create a colorful paper parrot that’s perfect for decoration, gifting, or school projects. Let’s dive into this fun and creative activity!
Materials You’ll Need
Before we get started, gather the following materials:
- 1 square piece of origami paper (preferably double-sided and colorful)
- A flat surface to fold on
- Optional: Markers for detailing eyes or feathers
Tip: A 6×6 inch paper is ideal for beginners, but you can go larger or smaller depending on your preference.
Origami Art and Craft Materials on Amazon
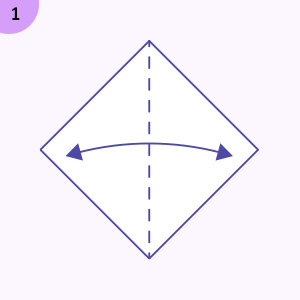
Step 1: Start With a Square Base
Place your origami paper with the colored side down. Fold the paper in half diagonally to make a triangle, then unfold. Now fold diagonally in the opposite direction and unfold again. You should have an “X” crease pattern.
Step 2: Fold Into a Triangle
Now fold your paper in half to form a large triangle. Make sure the creases are sharp and even. This will serve as the starting base for the parrot’s body.

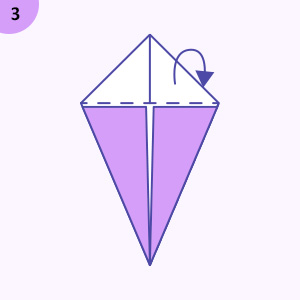
Step 3: Create a Kite Shape
Take the two bottom corners of the triangle and fold them up to meet the top corner. This will create a kite-like shape, which begins forming the wings and tail of the parrot.
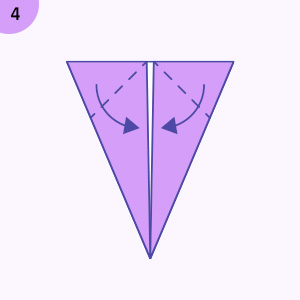
Step 4: Fold the Sides Inward
Now fold the outer edges of the kite shape inward so that they meet in the middle. You should now have a thinner kite shape. This is the start of the parrot’s body.
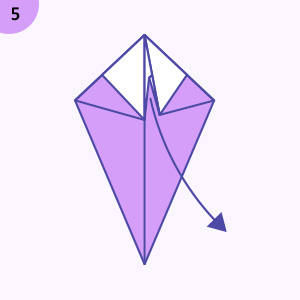
Step 5: Form the Head
Fold down the top corner of the kite about an inch. This small triangular fold will become the parrot’s head.
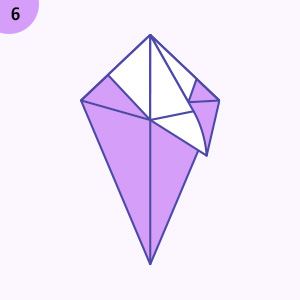
Step 6: Shape the Beak
Take the very tip of the head fold and fold it back up slightly to form a small triangle. This mimics the parrot’s curved beak.
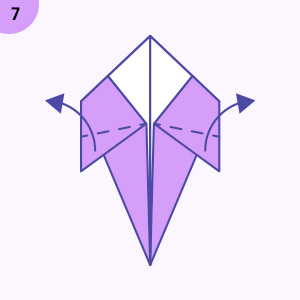
Step 7: Make the Wings
Unfold the flaps from Step 4 slightly and refold them at an outward angle to give the parrot realistic wing shapes. Make sure they are symmetrical.
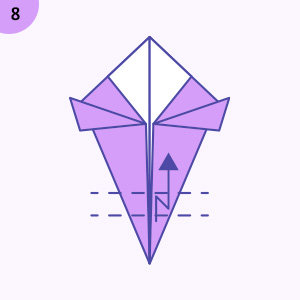
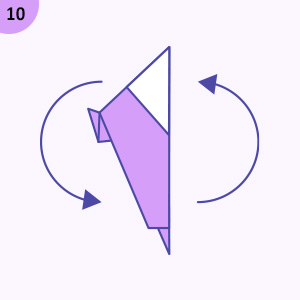
Step 8: Create the Body Fold
Fold the entire model in half vertically, so that the wings are on the outside and the head and beak point to one side. Press the fold tightly.
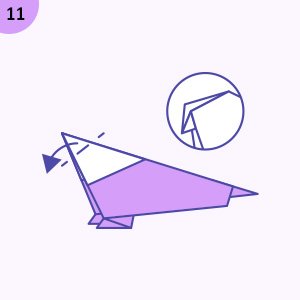
Step 9: Adjust the Tail
Fold the bottom tip of the model slightly upward at a diagonal angle. This creates the iconic long tail of the parrot.
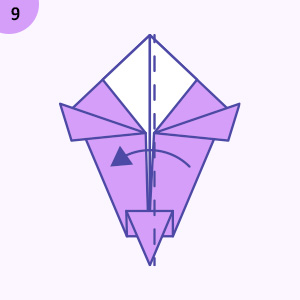
Step 10: Position the Head
Now take the parrot’s head and gently pull it upward so it stands upright from the body. Crease where necessary to hold its position.
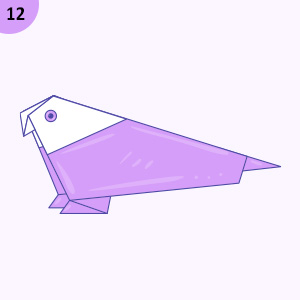
Step 11: Add Details
Use a marker or pen to draw eyes on either side of the parrot’s head. You can also decorate the wings and tail with colorful patterns if desired.
Step 12: Final Touches
Fluff out the wings slightly and adjust any creases for balance. Your origami parrot is now complete and ready to perch on your desk, hang from a string, or be part of a creative diorama.
Bonus Tips for Origami Success
- Choose the Right Paper: Thin origami paper works best as it folds easily and holds creases well.
- Take Your Time: Rushing through the folds can lead to uneven shapes. Be patient and precise.
- Practice Makes Perfect: Don’t worry if your first parrot isn’t perfect. Origami is all about practice and improvement.
- Use Color Strategically: Bright, tropical colors work well for parrots; try red, green, blue, and yellow.
Why Origami Is Great for All Ages
Making an origami parrot isn’t just a fun activity, it’s also beneficial for your brain and creativity. Origami helps improve:
- Fine motor skills
- Concentration
- Patience and persistence
- Spatial awareness
It’s a great hands-on activity for kids, adults, and even seniors looking to stay mentally active.
Creative Uses for Your Origami Parrot
Once you’ve mastered your origami parrot, you can use it in many creative ways:
- Party Decorations: Hang multiple parrots from strings for a tropical or jungle-themed party.
- Gifts: Attach your origami parrot to a card or gift box as a handmade touch.
- Educational Projects: Use it as a visual aid for presentations on animals, birds, or tropical habitats.
- Bookmarks: Flatten the parrot and use it as a fun, themed bookmark.
Conclusion
Learning how to make an easy origami parrot in 12 steps is a rewarding and fun craft that anyone can enjoy. With just a few folds and some colorful paper, you can create a charming paper bird that reflects both skill and creativity. Whether you’re crafting for fun, education, or decoration, this step-by-step guide makes it easy to bring a parrot to life, no scissors or glue required.
So grab your favorite origami paper and start folding today. Happy crafting!
SEO Keywords Used Naturally:
- easy origami parrot
- origami parrot step by step
- how to make origami parrot
- origami bird tutorial
- origami for beginners
- origami paper folding instructions