How To Make An Easy Origami Butterfly: 10 Step by Step Instructions
Origami, the ancient Japanese art of paper folding, offers a simple yet deeply satisfying way to create beautiful designs with nothing more than a sheet of paper. Among the most popular beginner-friendly origami projects is the origami butterfly. In this guide, we’ll show you how to make an easy origami butterfly step by step in 10 simple stages. Whether you’re a beginner or looking for a fun craft activity, this tutorial is perfect for all skill levels.
Let’s get started!
Why Make an Origami Butterfly?
Origami butterflies are more than just paper crafts. They symbolize transformation, creativity, and peace. They’re ideal for:
- Decorating gifts or cards
- DIY room décor
- Party or wedding decorations
- Fun activities for kids
Best of all, you only need a square piece of paper and a few minutes!
What You’ll Need
Before diving into the steps, gather your materials:
- One square sheet of paper (preferably colored or patterned)
- Flat surface to fold on
- Optional: A ruler or bone folder for crisp folds
Tip: Start with a 6 x 6 inch (15 x 15 cm) square paper. It’s easier to fold and handle for beginners.
Origami Art and Craft Materials on Amazon
How To Make An Easy Origami Butterfly: Step-by-Step Instructions
Step 1: Start With the Colored Side Down
Place your square paper flat on a surface with the colored or patterned side facing down. This ensures the color shows on the outside of your butterfly.
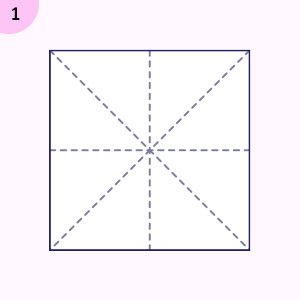
Step 2: Fold Diagonally (Both Ways)
Fold the paper diagonally from corner to corner to form a triangle. Crease well and unfold. Then, fold it diagonally the other way and crease again. Unfold.
You should now see an “X” crease pattern on your paper.
Step 3: Fold Horizontally and Vertically
Next, fold the paper in half horizontally (top edge to bottom edge). Crease and unfold. Repeat the same fold vertically (left to right). Unfold again.
Now, you’ll see a grid-like pattern with a central point where all folds meet.
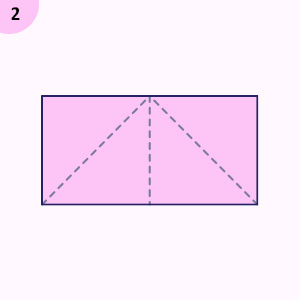
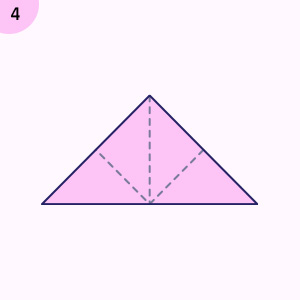
Step 4: Collapse into a Triangle Base
Hold the paper at the side edges and gently push inward. The paper will start to collapse into a flat triangle shape (also known as the “preliminary base” or “waterbomb base”). Flatten and align the corners.
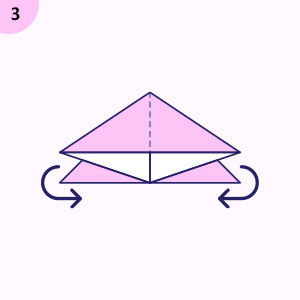
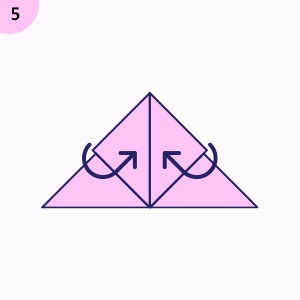
Step 5: Fold the Triangle Corners Up
With the triangle’s point facing down, fold the two top corners of the triangle down to the bottom point. This will create a diamond shape.
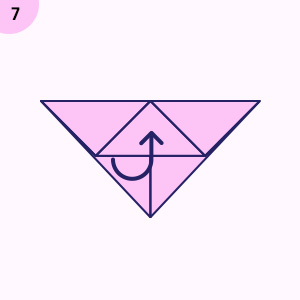
Step 6: Fold the Top Layer’s Bottom Point Up
Now, fold the bottom point of the top layer up past the top edge. This creates the butterfly’s body and helps lock the wings into place.
Tip: The more you fold up, the thicker the body will look.
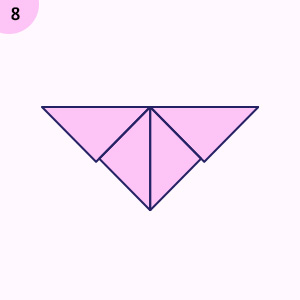
Step 7: Flip the Paper Over
Carefully turn the paper over to the other side so you can work on the back. The butterfly’s wings will be more visible on this side.
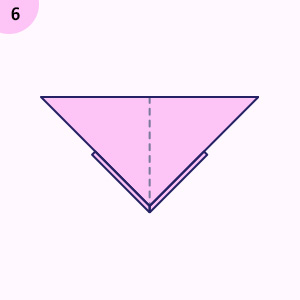
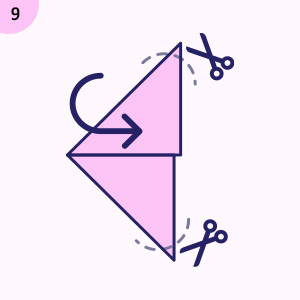
Step 8: Fold in Half Vertically
Fold the entire shape in half vertically (left wing to right wing), making sure the previous folds stay aligned. Press the middle to crease it firmly.
This will give your butterfly a raised body and add volume to the wings.
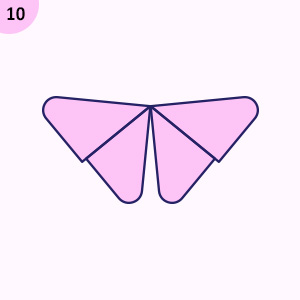
Step 9: Shape the Wings
Unfold slightly and gently pull the wings outward. Adjust them to achieve your desired wing shape. You can round the edges or leave them sharp for a more angular look.
Step 10: Final Adjustments
Your origami butterfly is complete! Flatten any uneven edges, fluff the wings, and admire your handiwork.
Want to take it further? Add details with a pen or decorate with glitter or stickers for a personalized touch.
Origami Butterfly Tips for Beginners
- Use thinner paper: Thinner origami paper is easier to fold and prevents bulky creases.
- Practice makes perfect: Your first butterfly might not be perfect, but worry not! Repeating the steps will make the process smoother.
- Decorate your butterflies: Use patterned paper or draw your designs to give your butterflies unique flair.
Fun Ways to Use Origami Butterflies
Once you’ve mastered how to make an easy origami butterfly, the creative possibilities are endless! Here are a few ideas:
- Wall Art: Create a butterfly wall collage in your bedroom or living room.
- Gift Embellishments: Tape one on top of a wrapped present for a creative touch.
- Party Décor: Hang butterflies on strings for whimsical party garlands.
- Bookmarks: Attach a paperclip to the bottom and use it as a cute bookmark.
- Handmade Cards: Glue a butterfly to a greeting card for a 3D effect.
Final Thoughts
Learning how to make an easy origami butterfly in just 10 steps is a fun, relaxing, and rewarding experience. Whether you’re a parent crafting with your child, a student taking a creative break, or simply someone looking for a stress-free DIY, origami butterflies offer a joyful outlet.
All you need is a square piece of paper, a bit of patience, and creativity. So grab your paper and start folding, your first butterfly is just 10 steps away!
SEO Keywords Used:
- how to make an easy origami butterfly
- origami butterfly step by step
- beginner origami tutorial
- easy paper butterfly instructions
- origami for kids and adults
- paper folding DIY