
How To Make An Easy Origami Squirrel – 13 Step-by-Step Instructions
Origami, the ancient Japanese art of paper folding, is a fun and creative way to turn a simple piece of paper into a work of art. If you’re looking for a new project, why not try making an origami squirrel? With just a square sheet of paper and some patience, you can craft an adorable little squirrel in just a few steps. In this guide, we’ll walk you through how to make an easy origami squirrel in 13 clear step-by-step instructions.
Whether you’re a beginner or an origami enthusiast, this tutorial will help you create a cute paper squirrel with ease!
What You’ll Need
Before we get started, here’s what you need:
- One square sheet of origami paper (preferably brown, orange, or grey)
- A flat surface
- Optional: bone folder or ruler for sharp creases
Origami Art and Craft Materials on Amazon
Step-by-Step Instructions to Make an Easy Origami Squirrel
Follow these 13 easy steps to fold your own origami squirrel:
Step 1: Start with the Colored Side Facing Down
Place your square paper on a flat surface with the colored side facing down. This ensures that the squirrel’s body will be the correct color.
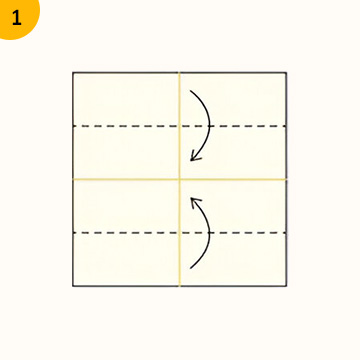
Step 2: Fold the Paper in Half Diagonally
Fold the paper diagonally from corner to corner to form a triangle. Make a sharp crease and unfold. Repeat for the opposite diagonal.
Step 3: Fold Into a Square Base
Using the creases you made, bring the two opposite corners together so the paper collapses into a square base. The open ends should be facing you.
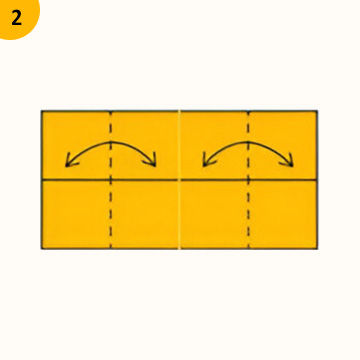
Step 4: Fold the Left and Right Edges to the Center
Take the left edge of the top layer and fold it toward the center crease. Repeat with the right edge to form a kite shape.
Step 5: Unfold the Previous Folds
Now, unfold the left and right folds. You’ll use these crease lines for the next step.
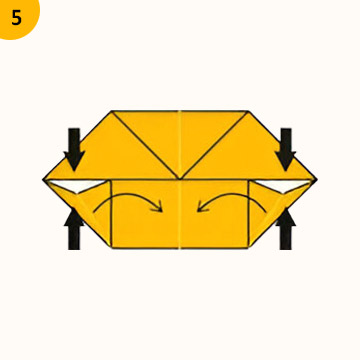
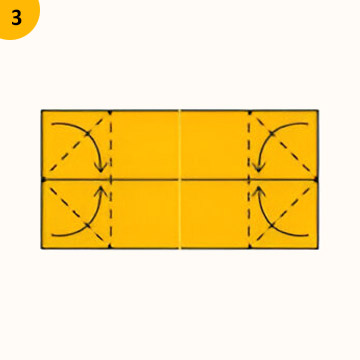
Step 6: Lift the Bottom Corner and Fold Into a Squash Fold
Lift the bottom corner of the top layer and fold it upward. As you lift, the sides will naturally collapse along the crease lines. Flatten them to form a squash fold.
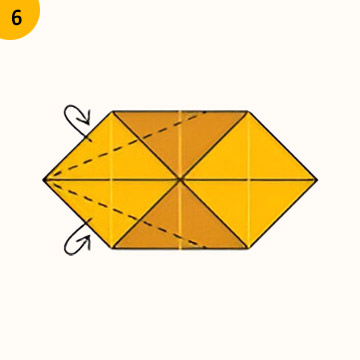
Step 7: Repeat Squash Fold on the Other Side
Flip the paper over and repeat the squash fold on the other side.

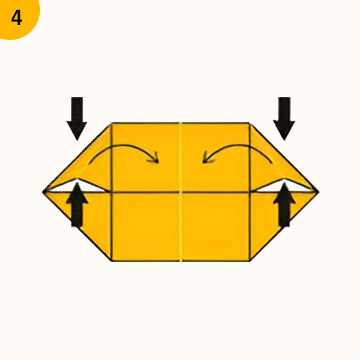
Step 8: Fold the Sides Toward the Center Again
Now, fold the left and right sides toward the center line, just like in Step 4. You’ll see a thinner kite shape forming.
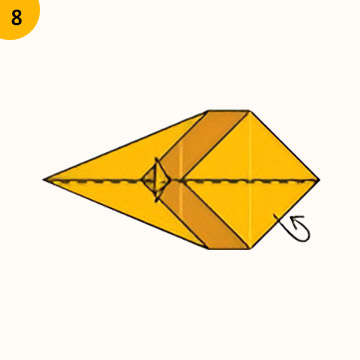
Step 9: Fold the Top Triangle Down
Fold the top triangle (just the tip) down and crease it well. This will help in forming the squirrel’s head.
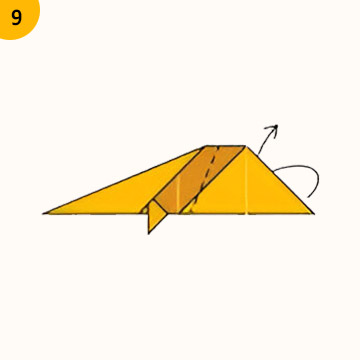
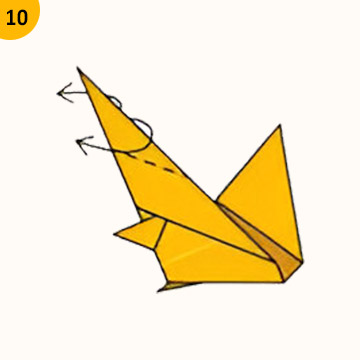
Step 10: Create the Squirrel’s Tail
Flip the model over. Fold the entire left side upward at a 45-degree angle. This will form the tail, one of the most iconic parts of a squirrel. You can adjust the angle to make the tail more or less dramatic.
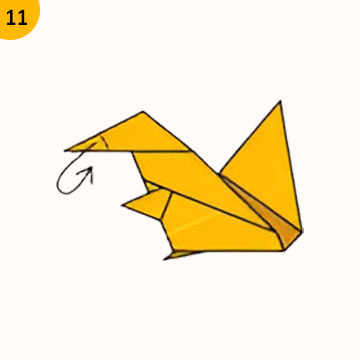
Step 11: Form the Head
Now, go to the right side (the squirrel’s front). Fold the tip downward to form a small triangular head. Make sure to leave a little space for the neck.
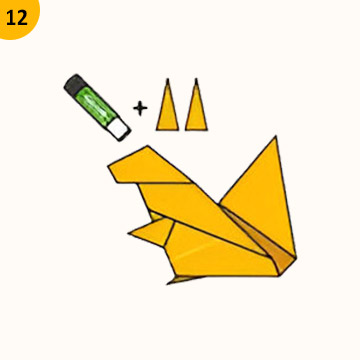
Step 12: Add Details to the Tail
If you’d like, make a slight reverse fold along the top of the tail to give it a curved, more natural shape. This small detail gives your origami squirrel more character.
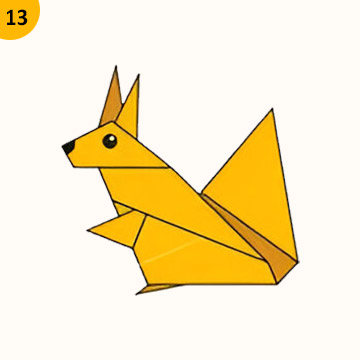
Step 13: Stand It Up and Adjust
Open the base slightly so the squirrel can stand upright. Gently adjust the head, tail, and body to create a more realistic and balanced shape.
Tips for Making a Great Origami Squirrel
- Use thinner paper: It folds more easily and holds creases better, especially for small or intricate folds.
- Crease firmly: Use your fingernail or a bone folder to make clean, crisp folds.
- Practice on plain paper before using patterned or colored origami sheets.
- Be patient: Some folds may take a couple of tries to perfect, especially if you’re new to origami.
Why Origami Is a Great Hobby
Origami is more than just a fun pastime. It improves concentration, enhances motor skills, and encourages creativity. Making animals like squirrels, birds, or elephants is a great way to relax and enjoy some screen-free time. It’s also a wonderful activity for kids and adults alike!
Plus, origami models make for great decorations, DIY gifts, and classroom activities.
Customize Your Origami Squirrel
Once you’ve mastered the basic folds, consider adding your own flair:
- Draw eyes and whiskers on the head.
- Use metallic or textured paper for a unique look.
- Create a mini woodland scene with other origami animals like foxes, owls, or rabbits.
Final Thoughts
Now that you know how to make an easy origami squirrel in 13 step-by-step instructions, you can enjoy the rewarding process of folding your own paper animal. It’s simple, fun, and doesn’t require any special tools, just a piece of paper and a bit of time.
Whether you’re crafting with kids, decorating your desk, or picking up a new relaxing hobby, this origami squirrel is a perfect project to try.
So grab a piece of paper and get folding, your origami forest friend awaits!


