
How To Make An Easy Origami Pigeon: 11 Step-by-Step Instructions
Origami is a timeless Japanese art that transforms a simple piece of paper into a beautiful masterpiece. Among the many animals you can fold, the origami pigeon stands out for its elegance, simplicity, and symbolism of peace. Whether you’re a beginner or just looking for a fun paper craft project, this guide will walk you through how to make an easy origami pigeon in 11 step-by-step instructions.
Let’s get started with this relaxing, creative activity that requires only one square sheet of paper and a little patience!
Why Make an Origami Pigeon?
Before we jump into the steps, let’s take a quick look at why this craft is so meaningful:
- Symbol of Peace: The pigeon, especially the dove, is a universal symbol of harmony and peace.
- Great for Beginners: This origami project is simple enough for children and adults alike.
- Enhances Focus: Like all paper folding arts, origami promotes mindfulness and boosts concentration.
- Decorative and Educational: Use it as home decor, a teaching tool, or a thoughtful handmade gift.
Materials You Will Need
To make your origami pigeon, you don’t need any fancy materials. Here’s what you’ll need:
- One square sheet of paper (preferably 6×6 inches or 15×15 cm)
- A flat surface
- Optional: Bone folder (for sharper creases)
Origami Art and Craft Materials on Amazon
11 Step-by-Step Instructions to Make an Easy Origami Pigeon
Follow these easy steps carefully. Visualizing each fold helps you get the best result. You may also keep a second sheet handy in case you’d like to redo a step.
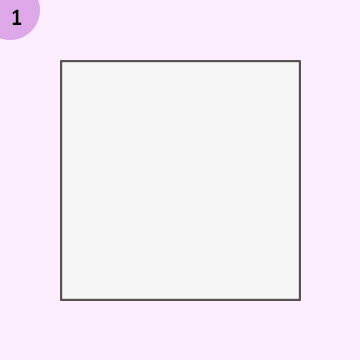
Step 1: Start with the Colored Side Up
Place your square paper flat on the table with the colored side facing up (if using colored paper). This ensures the pigeon ends up with the desired color on the outside.
Step 2: Fold the Paper Diagonally
Fold the square diagonally in half to form a triangle. Crease well and unfold. Now fold diagonally in the opposite direction. Unfold again. You should now see an “X” crease across your square.

Step 3: Fold into a Triangle (Base Fold)
Now fold the paper in half diagonally again, and keep it folded this time. This triangle will be your starting base for the pigeon.

Step 4: Fold One Corner Up
Take the bottom right corner of the triangle and fold it up toward the top corner. The edge should align with the center fold. Crease firmly. Repeat this on the bottom left corner as well.

Step 5: Create the Body Base
Now flip the paper over. Take the bottom tip (the point sticking down) and fold it upward, about 1 inch from the top edge. This forms the body and tail of the pigeon.

Step 6: Fold the Paper in Half Vertically
Fold the entire structure in half vertically (left to right), so that the pigeon is now narrow with one wing on each side. You’ll now see the general pigeon shape forming.
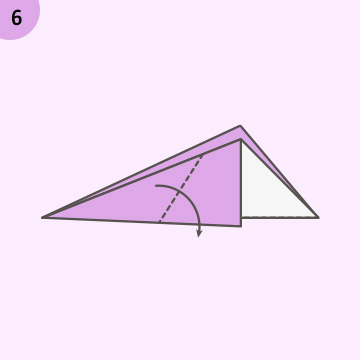
Step 7: Make the Neck Fold
Now take the top section, which will become the neck, and fold it upward at a slight angle. Crease firmly. You can adjust the angle depending on how upright you want your pigeon to look.

Step 8: Shape the Head
Fold down the tip of the neck (about half an inch) to form the pigeon’s head. Adjust to make it rounded or pointed based on your preference.

Step 9: Adjust the Wings
Gently pull down the top flaps (the wings) on both sides, and fold them downward so that they rest angled slightly down and outward. You now have a realistic pigeon wing posture.

Step 10: Shape the Tail
To give your pigeon a more dynamic look, fold a small triangle inward on the tail end. This gives the tail a nice point and balances the body structure.
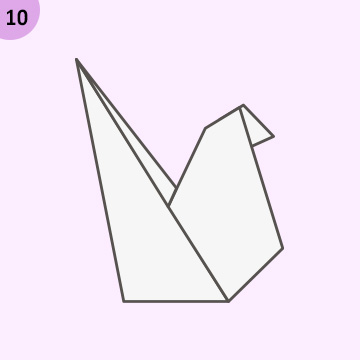
Step 11: Final Adjustments
Unfold the wings slightly, shape the neck if needed, and crease all lines to firm up your pigeon. You can now stand your origami pigeon upright or let it sit flat.

Tips for a Better Origami Pigeon
- Use thinner origami paper: Thicker paper is harder to fold and can cause uneven creases.
- Practice with scrap paper first: Especially if you’re new to origami.
- Decorate it: Add a small eye with a marker or decorate with glitter for a festive version.
- Make multiple pigeons: Group them together to create a peaceful paper flock!
Common Mistakes to Avoid
- Misaligned Folds: Take time to align edges and corners perfectly.
- Weak Creases: Use a ruler or fingernail to make sharper creases.
- Forgetting to Flip the Paper: Step 5 requires flipping the model, don’t skip it!
- Too Much Pressure: Don’t press too hard or the paper may tear or crumple.
Creative Uses for Your Origami Pigeon
Now that you’ve crafted your paper bird, here are some creative ways to use it:
- Classroom or school projects
- Table centerpiece for events
- Hanging mobile or wall art
- Gifts with a message of peace
- Bookmark or desk decor
You can even use string to hang it from the ceiling or attach it to a gift box for an elegant touch.
Final Thoughts
Creating an origami pigeon is a rewarding and meditative experience. With just 11 simple steps, you can bring a piece of paper to life and share a message of peace and calm. Whether you’re making it for fun, decoration, or as a handmade gift, the origami pigeon is a craft that anyone can enjoy.
So grab your paper and give it a try, soon, you’ll have a peaceful little bird of your own.
SEO Keywords Summary
- Easy origami pigeon
- Origami pigeon instructions
- How to make origami pigeon
- Step-by-step origami tutorial
- Origami bird for beginners
- Paper pigeon fold
- Origami craft ideas


