How To Make An Easy Origami Bird: 6 Step-by-Step Instructions
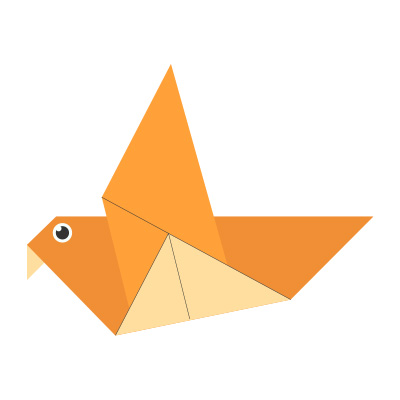
If you’ve ever been fascinated by the art of paper folding, origami is the perfect way to unleash your creativity. One of the most iconic figures in origami is the bird. With just a simple square sheet of paper, you can create a stunning paper bird that symbolizes peace, freedom, and elegance. Whether you’re a beginner or helping a child with a craft project, this guide will walk you through how to make an easy origami bird in 6 step-by-step instructions. Plus, you’ll find a downloadable Origami Bird Instructions PDF at the end of the article for offline reference.
What is Origami?
Origami is the traditional Japanese art of folding paper into decorative shapes and figures without using glue or scissors. The word “origami” comes from “ori” meaning fold, and “kami” meaning paper. Origami birds are among the most beloved forms, especially the crane, which holds deep cultural and spiritual significance in Japan.
Why Make an Origami Bird?
Making an origami bird isn’t just a fun and relaxing activity. It also offers several benefits:
- Enhances concentration and mindfulness
- Boosts hand-eye coordination
- Encourages patience and focus
- Creates beautiful handmade gifts or decorations
Whether you’re crafting for fun, teaching a classroom, or decorating your space, origami birds are a great choice.
Materials You Will Need
Before you begin, make sure you have the following:
- A square sheet of origami paper (15cm x 15cm is a great starting size)
- A flat surface to work on
- Patience and a positive attitude!
Tip: If you don’t have origami paper, you can cut any square paper from regular A4 sheets.
Origami Art and Craft Materials on Amazon
How to Make an Easy Origami Bird: 6 Step-by-Step Instructions
Here’s a simple and effective way to make your first origami bird.
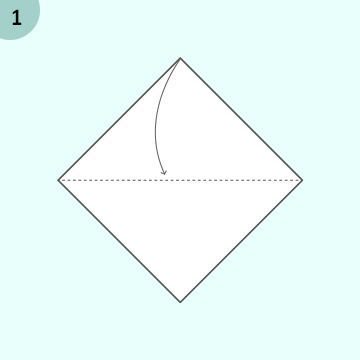
Step 1: Start with a Square Paper – Fold Diagonally
Place your paper colored side up (if using colored paper). Fold it diagonally in half to form a triangle. Make sure the corners align perfectly, then crease the fold well and unfold it.
Now, fold diagonally the other way and crease again. When you unfold, you’ll have an “X” crease pattern.
Step 2: Fold in Half – Create a Rectangle
Now, fold the paper in half vertically to form a rectangle. Crease well and unfold. Then, fold in half horizontally to make another rectangle. Unfold again.
You should now see creases forming a star-like pattern. These folds will help guide the bird’s shape later.

Step 3: Create the Preliminary Base (Square Base)
Take each corner of the paper and bring them together to the center. Collapse the paper inward following the creases to form a smaller square (also called a square base or preliminary fold).
You should now have a diamond shape with an open bottom.
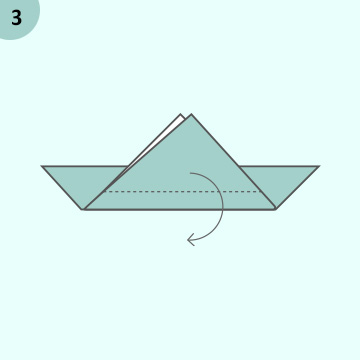
Step 4: Fold the Edges to the Center Line
Take the right edge of the top layer and fold it to the center crease. Repeat with the left edge to form a kite shape.
Now, fold the top triangle (above the kite) downward. Unfold all these folds to prepare for the next step.
These pre-creases are essential for the bird’s head and tail.

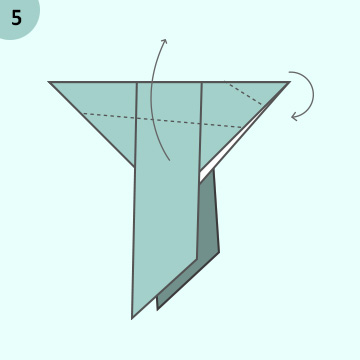
Step 5: Form the Bird Base
Lift the top layer of the bottom corner and open it up. As you do this, fold the sides inward along the creases made in Step 4. Flatten it down into a diamond shape.
Flip the paper over and repeat the process on the other side.
This is the “bird base,” commonly used in many origami bird models.
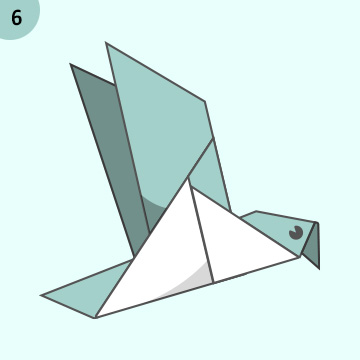
Step 6: Make the Head, Tail, and Wings
- Fold one of the narrow ends up to form the bird’s tail.
- Fold the other narrow end upward, then fold down the tip to form the bird’s head.
- Now, fold down both top flaps on each side to create the wings.
Adjust the wings and head slightly to give your bird a lively, three-dimensional appearance.
Congratulations! You’ve just created your own origami bird.
Tips for Origami Beginners
- Use thinner paper: It folds more easily and gives sharper creases.
- Work on a hard surface: This helps with precision and symmetry.
- Take your time: Accuracy is more important than speed.
- Practice makes perfect: Your first bird may not be flawless, but every attempt improves your skill.
Creative Ideas for Your Origami Birds
Once you’ve mastered the basics, here are a few fun ways to use your origami birds:
- String them together for a mobile or garland
- Add them to greeting cards or gift wrapping
- Use them as table decorations for parties
- Create a wall art installation
- Incorporate into journaling or scrapbooking projects
Origami birds are not only symbolic but also visually striking. A colorful collection can breathe life into any space.
Final Thoughts
Learning how to make an easy origami bird in 6 simple steps is a rewarding and meditative process. With just a piece of paper and some patience, you can bring a bird to life with your own hands. Whether you’re doing it for fun, for kids, or as a stress-relieving hobby, origami offers a beautiful way to express creativity.
Don’t forget to grab your Origami Bird Instructions PDF and keep practicing. With time, you’ll be able to create more complex and stunning origami birds that will amaze your friends and family.
FAQs
Q: Can I use printer paper instead of origami paper?
A: Yes! Just cut it into a perfect square. Thinner paper is easier to fold.
Q: What age is origami suitable for?
A: Origami can be enjoyed by anyone aged 5 and up, depending on the complexity of the model.
Q: How long does it take to make an origami bird?
A: The basic bird in this guide can be made in under 10 minutes.
Q: Is there a difference between the origami crane and this bird?
A: Yes, the origami crane is a more advanced version with more folds. This guide focuses on a beginner-friendly bird.
Keywords: How to make an easy origami bird, step-by-step origami bird, origami bird instructions, origami bird instructions PDF, easy paper bird, origami for beginners, DIY paper bird, folding paper bird, origami art project, origami bird craft.