
How to Fold an Easy Origami Brachiosaurus – 10 Step-by-Step Instructions
Origami, the ancient Japanese art of paper folding, has captured the hearts of creatives and hobbyists worldwide. Among the vast array of paper creations, dinosaurs hold a special place, especially the majestic Brachiosaurus with its towering neck and gentle stance. In this guide, you’ll learn how to fold an easy origami Brachiosaurus with 10 simple step-by-step instructions. Whether you’re a beginner or an origami enthusiast, this dinosaur will be a fun and rewarding project.
Why Choose a Brachiosaurus Origami?
The Brachiosaurus is one of the most recognizable dinosaurs due to its long neck and massive body. Folding this gentle giant in origami form helps boost your creativity, hand-eye coordination, and patience. Plus, it makes a perfect decoration or gift for dinosaur lovers!
Materials You Will Need
Before starting, gather the following materials:
- 1 square sheet of origami paper (preferably 6×6 inches or larger)
- A flat surface
- Optional: Bone folder or ruler for sharp creases
Tip: Choose a color that reflects the dinosaur look, green, brown, or even a funky pattern for a more playful version.
Origami Art and Craft Materials on Amazon
How to Fold an Easy Origami Brachiosaurus: 10 Step-by-Step Instructions
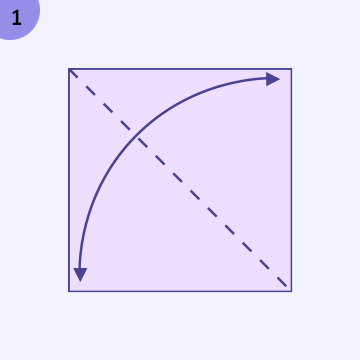
Step 1: Start with a Square Paper – Color Side Up
Place the paper color side facing up. Fold it in half diagonally from one corner to the opposite corner. Unfold. Repeat the same with the other diagonal. This forms an “X” crease on your paper.
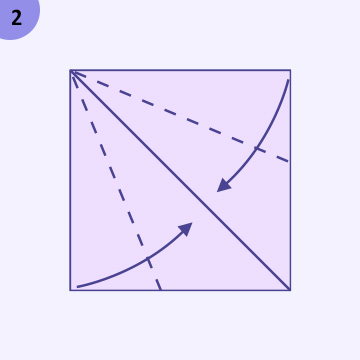
Step 2: Fold into a Triangle Base
Flip the paper over (white side up), then fold the paper in half vertically and horizontally. Unfold each time. You should now have creases in a “+” pattern intersecting the diagonal “X”.
Now, push the side corners inward while guiding the top and bottom corners together, collapsing the paper into a triangle base (also called the waterbomb base).
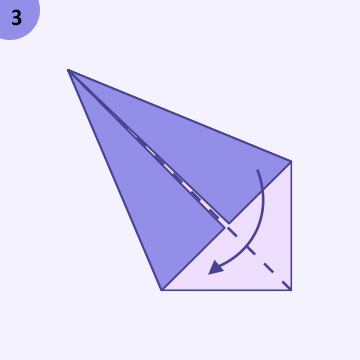
Step 3: Form the Preliminary Base
Take the right and left corners of the triangle and fold them up to meet the top corner. You’ll now have a diamond shape with a central vertical line.
Repeat this fold on the backside as well.
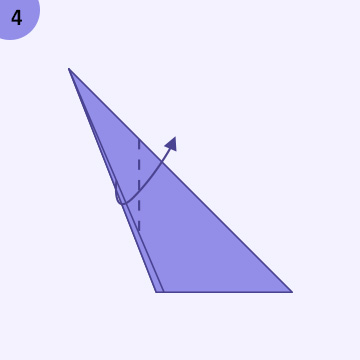
Step 4: Fold the Legs
On the front side of the diamond, take the bottom corner and fold it up to meet the top corner. Unfold.
Now open the front flap and reverse fold it along the crease to form a leg. Repeat this on the opposite side for the second leg.
Flip the model over and repeat the same two leg folds on the back flaps. Now your Brachiosaurus has four legs!
Step 5: Create the Body
Hold the model so the legs point downward. Fold the top layer down from the tip to about halfway to form a broad flat triangle, this will become the base of the body.
Flip over and repeat on the back side.
Step 6: Shape the Tail
Take the left flap sticking out (opposite the one you’ll use for the neck), and fold it outward slightly downward to form the tail.
Use a reverse fold to bend it upward slightly to give it a curved tail look. Press firmly to crease.
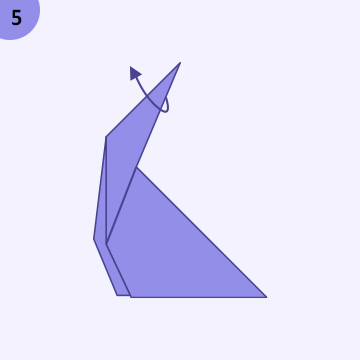
Step 7: Form the Long Neck
Now take the right flap. Fold it upward at an angle, this will be the Brachiosaurus’ long neck.
Use a reverse fold to tuck it inside the model slightly, which gives a cleaner neck structure. Make sure the neck is long and stands up straight, just like a real Brachiosaurus!
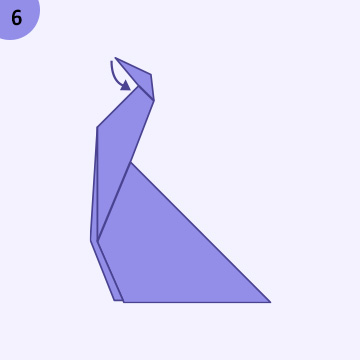
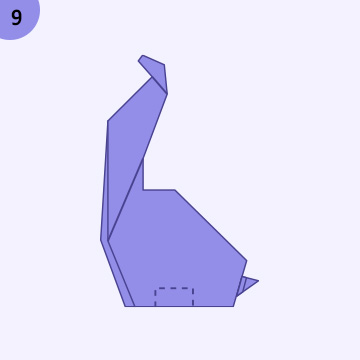
Step 8: Shape the Head
At the top of the neck, fold down a small portion to create the head.
You can shape the head more realistically by folding in the edges or adding a tiny curve with your fingers. This gives your origami dinosaur character and expression.
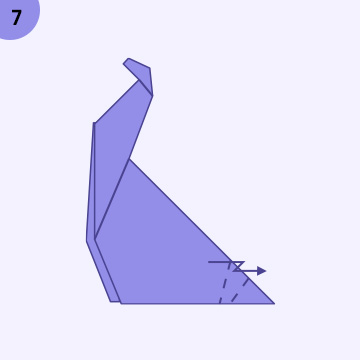
Step 9: Adjust the Legs and Posture
Fold the legs outward slightly so the dinosaur can stand on its own. You may need to adjust the angles and refold them if necessary.
If the paper feels too thick at the base, gently flatten or thin out the leg folds to ensure the Brachiosaurus balances well.
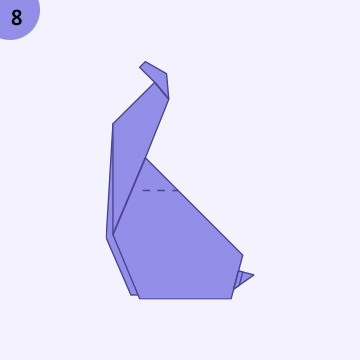
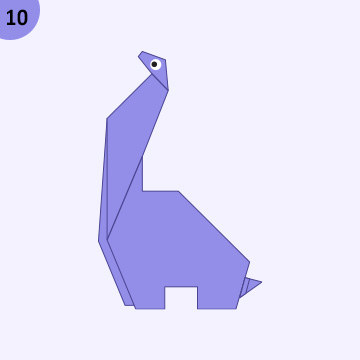
Step 10: Add Final Touches
Once the basic shape is complete, take a moment to refine the creases, adjust the proportions, and smooth out any wrinkles. Your easy origami Brachiosaurus is now complete!
Optional: Draw small eyes or details on the head using a fine-tip marker to bring your dinosaur to life.
Origami Tips for Beginners
- Practice on plain paper before using decorative sheets.
- Always make sharp creases for a clean look.
- Don’t rush, patience is key to accurate folds.
- Use tweezers for tiny folds if your fingers feel too big.
- Watch a video alongside this guide if you’re a visual learner.
Creative Ideas for Your Origami Brachiosaurus
Now that you’ve folded your first Brachiosaurus, why stop there? Here are some fun ideas:
- Create a dinosaur park with multiple origami species.
- Use different colored paper to make a rainbow dino collection.
- Add them to a science project or diorama.
- Attach a magnet to the back for a fun fridge decoration.
- Make a mobile or garland for a dinosaur-themed birthday party.
Final Thoughts
Folding an origami Brachiosaurus is a creative and educational experience. With these 10 easy step-by-step instructions, you’ve just made a fun paper dinosaur that can be proudly displayed or shared. Whether you’re folding with kids, teaching a classroom, or just relaxing at home, origami brings joy, focus, and a deep sense of satisfaction.
So grab another sheet and try again, or challenge yourself with a T-Rex next!
- how to fold an easy origami Brachiosaurus
- step-by-step instructions
- origami dinosaur
- easy origami for beginners
- dinosaur origami
- Brachiosaurus paper fold
- origami guide for kids
- fun origami projects


