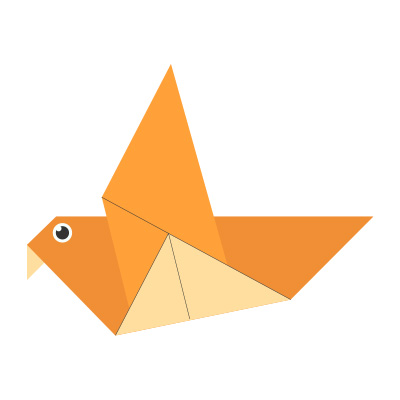
How To Make An Easy Origami Chicken: 9 Step-by-Step Instructions
Origami is a timeless Japanese art of paper folding that transforms a simple sheet into stunning shapes and figures. One of the most popular and beginner-friendly origami projects is making an origami chicken. Whether you’re a craft enthusiast, a teacher looking for a fun classroom activity, or just someone who wants to explore creativity, this guide is perfect for you.
In this tutorial, you’ll learn how to make an easy origami chicken in 9 simple steps using just one square piece of paper. No glue, no scissors, just folds and fun!
Why Try Origami?
Before we dive into the steps, let’s quickly look at why origami is a great hobby:
- Improves focus and patience
- Enhances hand-eye coordination
- Boosts creativity
- Affordable and eco-friendly
- Fun for all ages
Now, let’s jump into making your very own paper chicken!
Materials You’ll Need
- One square piece of origami paper (15cm x 15cm is ideal)
- A flat surface
- Optional: Marker pens to add eyes and feathers
You can use any kind of paper, but origami paper folds better and comes in fun colors or patterns. Yellow or white paper is perfect for a chicken!
Origami Art and Craft Materials on Amazon
How To Make An Easy Origami Chicken: 9 Step-by-Step Instructions
Step 1: Start With a Square Paper (Colored Side Down)
Place your square paper on a flat surface with the colored side facing down. This ensures the final chicken has the color showing on the outside.
Step 2: Fold Diagonally (Triangle Fold)
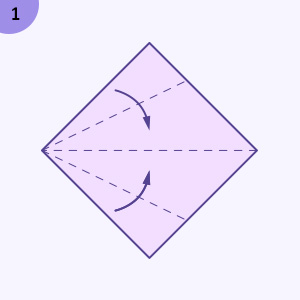
Fold the paper diagonally from the top corner to the bottom corner to create a triangle. Press the fold firmly and then unfold. Repeat for the other diagonal. You should now see an “X” crease.
Step 3: Fold in Half (Both Ways)
Next, fold the square in half horizontally and vertically. Unfold both times. Now your paper should have a star-like crease pattern intersecting in the center.
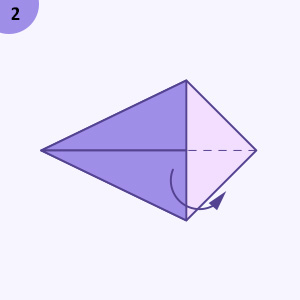
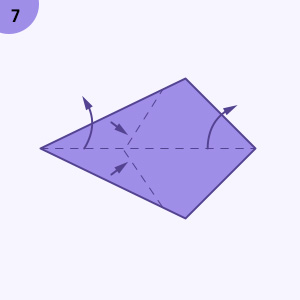
Step 4: Create a Diamond Base (Preliminary Base)
Using the crease lines as a guide, bring the top and bottom corners inward toward the center while allowing the side corners to come together. This will naturally collapse into a diamond shape, also known as the preliminary base.

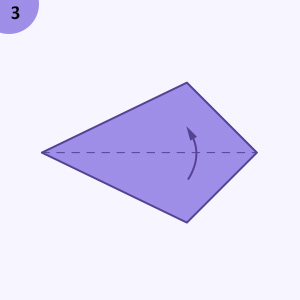
Step 5: Fold the Bottom Edges to the Center Line
Take the two bottom edges of the diamond and fold them in to meet the center vertical line. These form the wings of your chicken.
Step 6: Create the Head
Take the top flap and fold it downward; this forms the chicken’s head. You can make a small reverse fold at the tip to create a beak.
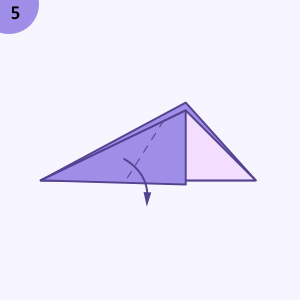
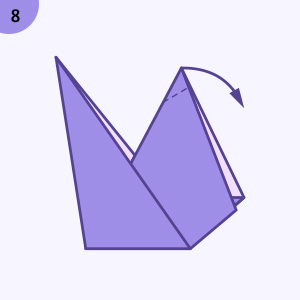
Step 7: Fold the Body in Half
Now fold the entire model in half vertically (lengthwise), tucking the wings inside and forming a side profile of the chicken.
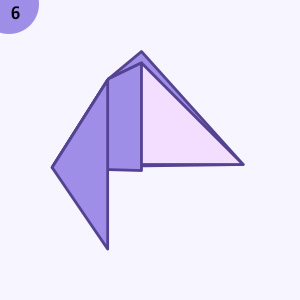
Step 8: Shape the Tail
Lift the back flap (the tail) and fold it upward at an angle. Adjust based on how upright or laid-back you want the tail to look.
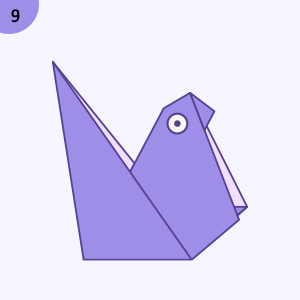
Step 9: Add Final Details
Gently open the wings slightly to give them a more 3D look. Use a black marker to draw two small dots for eyes and maybe some lines to suggest feathers. Voila! You now have a cute origami chicken!
Tips for Better Origami Results
- Crease sharply: Use a ruler or fingernail to make crisp folds.
- Practice with scrap paper before using decorative origami paper.
- Watch your angles: Origami is about precision.
- Don’t worry if it’s not perfect. Even imperfect chickens are adorable!
Creative Ideas for Using Origami Chickens
Wondering what to do with your paper chicken once it’s done? Here are some fun ideas:
- Use them as place cards at Easter or dinner parties.
- Attach to greeting cards for a handmade touch.
- Create a paper farm with other origami animals like cows, pigs, or ducks.
- Classroom activities or storytelling props for teachers.
- Gift decorations or bookmarks.
Origami Chicken FAQs
Q: Is origami difficult for beginners?
A: Not at all! This origami chicken is one of the easiest animal designs, perfect for all ages.
Q: Can I use regular printer paper?
A: Yes, but cut it into a square first. Origami paper is better for folding, but any paper works.
Q: How long does it take to make?
A: Around 5 to 10 minutes, depending on your skill level.
Q: Can I color or decorate my chicken afterward?
A: Absolutely! Add stickers, glitter, or patterns to personalize your chicken.
Final Thoughts
Learning how to make an easy origami chicken step by step is a fantastic way to explore your creative side while enjoying a relaxing activity. In just 9 simple steps, you can turn a flat piece of paper into a charming 3D chicken. It’s an engaging project for kids, adults, crafters, and teachers alike.
Whether you’re decorating for a holiday, teaching a class, or just unwinding after a long day, origami offers a joyful and satisfying experience. So grab some paper and get folding, your paper chicken awaits!
SEO Keywords Used Naturally Throughout:
- How to make an easy origami chicken
- Origami chicken step by step
- Easy origami for beginners
- Origami animal tutorial
- Paper chicken origami instructions