
How To Make An Easy Origami Elephant: 10 Step-by-Step Instructions
If you’re looking for a fun, creative, and relaxing DIY activity, learning how to make an easy origami elephant is a great place to start. Origami is a traditional Japanese art form that turns a simple square of paper into intricate shapes, no glue or scissors needed. Whether you’re a beginner or just want a quick paper craft project, this step-by-step guide will help you create a charming elephant using just one piece of paper. Let’s dive into this easy origami elephant tutorial in just 10 simple steps.
Why Try Origami?
Before we get started, here’s why origami is a wonderful hobby:
- It enhances concentration and patience.
- It improves fine motor skills.
- It’s a great stress-reliever.
- You only need paper, it’s affordable and portable.
- It sparks creativity and provides a sense of achievement.
Now, grab a square sheet of origami paper (preferably 6×6 inches) and let’s begin.
Origami Art and Craft Materials on Amazon
Step-by-Step Instructions: How To Make An Easy Origami Elephant
Step 1: Start With a Square Paper, Color Side Up
Place your square paper flat on a surface with the colored side facing up (this will be the elephant’s outer skin). Make sure it’s aligned properly before folding.

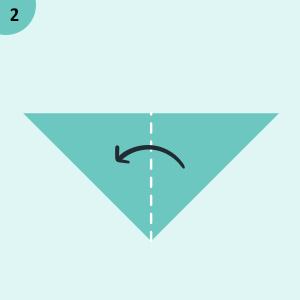
Step 2: Fold Diagonally in Half (Corner to Corner)
Take the top right corner and fold it down to meet the bottom left corner, forming a triangle. Press the crease firmly, then unfold it.
Now repeat with the other diagonal: top left corner to bottom right corner. Unfold again. You should now see an “X” crease on the paper.
Step 3: Fold Vertically and Horizontally
Fold the square in half vertically (left edge to right edge) and crease well. Unfold it. Then do the same horizontally (top to bottom) and unfold.
You should now have a star-like pattern with eight triangular sections.
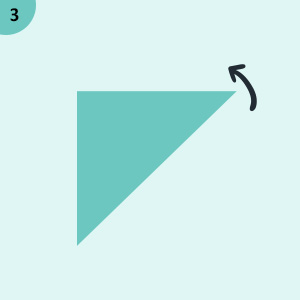
Step 4: Create a Waterbomb Base
Using the creases you made, pinch the paper together at the sides to collapse it into a smaller square; this is called the waterbomb base. You should end up with a triangle with the open side facing down.

Step 5: Fold the Top Layers to the Center
Take the two top edges of the triangle and fold them toward the center crease line. This forms a diamond shape on top.

Step 6: Fold the Bottom Point Up
Now, fold the bottom triangle (the point sticking out at the bottom of your diamond) upwards. This will start shaping the elephant’s body.
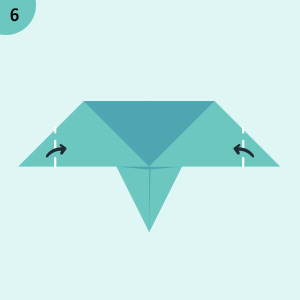
Step 7: Create the Elephant’s Ears
Fold both the left and right flaps (the upper sides of the diamond) outward diagonally to form large triangle shapes, these are the elephant’s ears. Make sure they’re symmetrical.

Step 8: Shape the Trunk
Flip the figure over. You’ll see a flap at the front center, this is the elephant’s trunk.
Gently fold it downward to the desired length. You can fold the tip slightly upward to make it look like a curved trunk.

Step 9: Fold the Back for Legs
Now flip the paper back to the front. Fold the bottom edges backward slightly to form the elephant’s legs. These small folds help the figure stand.

Step 10: Add Final Touches
At this point, your origami elephant is almost done! You can:
- Slightly curve the ears by curling the paper edges.
- Use a pen to draw eyes.
- Adjust the trunk and legs for better balance.

Congratulations, you’ve now made a simple, adorable origami elephant in 10 easy steps!
Tips for Beginners
- Use thinner origami paper for easier folds.
- Practice with larger paper before moving to small, detailed ones.
- Don’t rush, neat creases make a big difference.
- Watch videos or tutorials if visual aids help.
Fun Ways to Use Your Origami Elephant
- Decorate your room or workspace.
- Make greeting cards or bookmarks.
- Create a whole origami animal collection.
- Use them as party decorations or gifts for kids.
You can even experiment with patterned or metallic paper to create colorful elephants that stand out.
SEO Keywords Used in This Article
This guide integrates popular and trending keywords such as:
- How to make an easy origami elephant
- Easy origami elephant step by step
- Origami elephant instructions
- DIY paper elephant craft
- Origami animal tutorial
- Origami for beginners
- Fun origami project
Conclusion
Origami is more than just folding paper, it’s about patience, creativity, and finding joy in simple things. With just 10 straightforward steps, you now know how to make an easy origami elephant that looks cute and charming. Whether you’re crafting solo, with kids, or hosting a creative party, this DIY elephant is sure to impress.
So grab your favorite paper, follow the steps, and watch your flat sheet transform into an elephant full of character. Happy folding!


