How To Make An Easy Origami Mushroom 11 Step by Step
Origami is a timeless craft that brings paper to life through simple folds and creative imagination. Whether you’re a beginner or an experienced paper artist, making an origami mushroom is a fun and rewarding project. In this guide, you’ll learn how to make an easy origami mushroom in 11 step-by-step instructions, perfect for kids, hobbyists, and anyone wanting to explore paper folding.
This delightful mushroom design requires no glue, scissors, or special tools, just a square sheet of paper and a little patience. Ready to start folding? Let’s dive in!
What You’ll Need
Before we begin, gather your materials:
- 1 square sheet of origami paper (15×15 cm is ideal)
- A flat surface for folding
- Optional: A bone folder or ruler to press folds
Tip: Use red origami paper with a white side to give your mushroom a classic toadstool look.
Origami Art and Craft Materials on Amazon
Step-by-Step Instructions: How To Make An Easy Origami Mushroom
Step 1: Start with the Colored Side Up
Place your paper colored side facing up (white side down). This will ensure the mushroom cap shows the color, and the stem will be white.
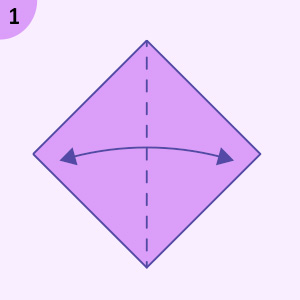
Step 2: Fold Diagonally in Half (Both Directions)
Fold the paper diagonally from corner to corner, creating an X crease. Unfold after each fold. These creases will help guide your next steps.
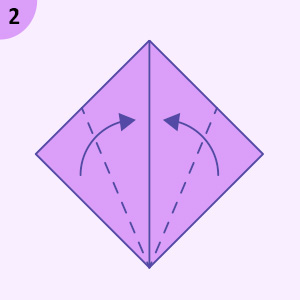
Step 3: Fold the Paper in Half Horizontally and Vertically
Now fold the paper in half horizontally and then vertically. When you unfold, you should see a total of four crease lines forming a grid with an “X” and a “+”.
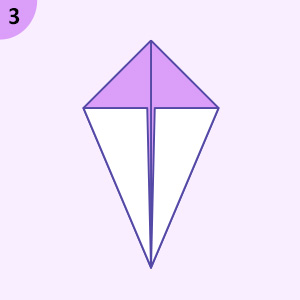
Step 4: Collapse into a Preliminary Base (Square Base)
Use the crease lines to collapse the paper into a square base. Bring two opposite corners together and flatten into a smaller square (with flaps).
This is also called the preliminary base in origami.
Step 5: Fold the Top Flaps to the Center Line
Take the right and left edges of the top layer and fold them to the center crease to form a kite shape.
Repeat this on the back side of the square base as well.
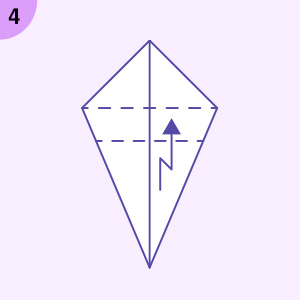
Step 6: Fold Down the Top Triangle
Fold the top triangle (formed by the kite folds) downward, creasing it well. This will later become part of the mushroom cap.
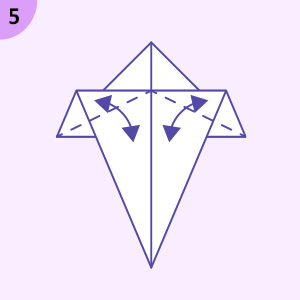
Step 7: Unfold Previous Folds
Unfold the last three folds, both sides, and the top triangle. These were pre-requisites to guide the next step.
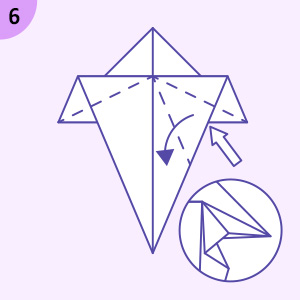
Step 8: Inside Reverse Fold the Top Section
Carefully open up the top flap and tuck the triangle inside, reversing the fold using the crease lines.
This step may be a bit tricky, take your time to align the folds properly. You should now see a small triangle peeking out from the top.
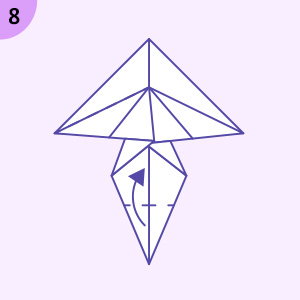
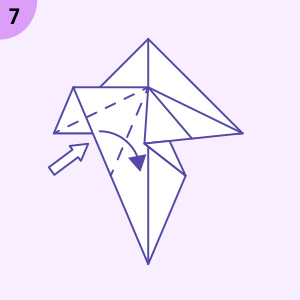
Step 9: Create the Mushroom Cap
Now fold the top layers outward (left and right) to form a flat triangle cap. This gives the top of the mushroom its wide, rounded look.
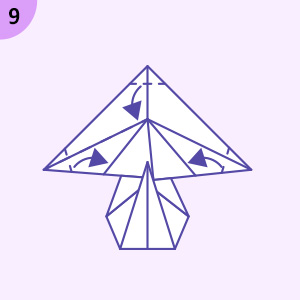
Step 10: Form the Mushroom Stem
Flip the paper over and fold the bottom section upward slightly to shorten the stem. Fold the sides inward slightly to round out the stem and give it a natural look.
Adjust the angle depending on how thick or narrow you want the stem.
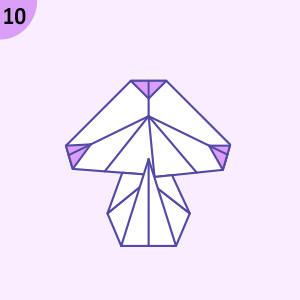
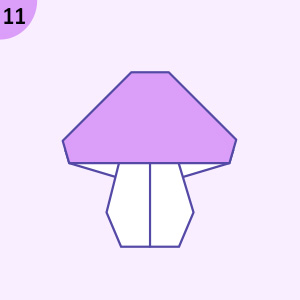
Step 11: Add Final Touches and Shape
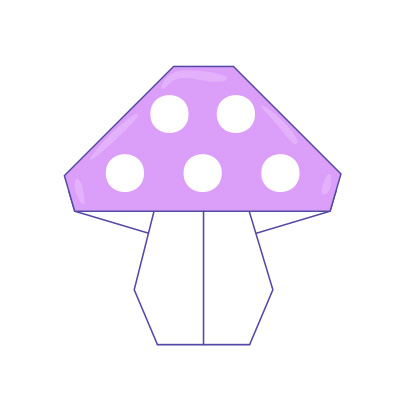
Make small tweaks to the mushroom cap and stem to give it your desired shape. Flatten the model gently with your hands or a tool. You now have a complete origami mushroom!
Tips for Success
- Use thinner paper if you’re a beginner. It folds more easily and holds creases better.
- Practice with scrap paper before using decorative or patterned sheets.
- Want a more realistic mushroom? Try drawing dots on the red cap or folding a slightly curved edge for a 3D look.
- Don’t worry if your first try isn’t perfect, origami is about patience and practice.
Benefits of Learning Origami
Besides being fun, origami has many surprising benefits:
- Improves hand-eye coordination and fine motor skills
- Encourages focus, patience, and creativity
- A great stress reliever
- Helps children with geometry and spatial thinking
Making an origami mushroom is an excellent beginner project and can be used for decorations, gifts, classroom activities, or DIY crafts.
Origami Mushroom Ideas & Uses
Once you master the mushroom, here are a few creative ways to use it:
- Create a forest scene on a wall or greeting card
- Add to DIY terrariums or miniature displays
- Use in scrapbooking or journal decoration
- Make multiple mushrooms in different colors for a cute garland
- Combine with other origami pieces (like frogs, flowers, or trees)
Final Thoughts
Now that you know how to make an easy origami mushroom in 11 steps, the possibilities are endless. With just a square piece of paper, you’ve created something charming and unique. Whether you’re folding solo, teaching kids, or crafting with friends, this mushroom adds a fun and whimsical touch to any project.
So grab another sheet of paper and make a mushroom family!
FAQ About Origami Mushrooms
Q: Can I use regular printer paper?
A: Yes, but cut it into a perfect square first. Origami paper works best because it’s thin and folds more easily.
Q: Is this origami mushroom good for kids?
A: Absolutely! As long as they have some basic folding skills and adult supervision, it’s a great hands-on activity.
Q: How long does it take to make one?
A: Around 5–10 minutes, depending on your experience.


