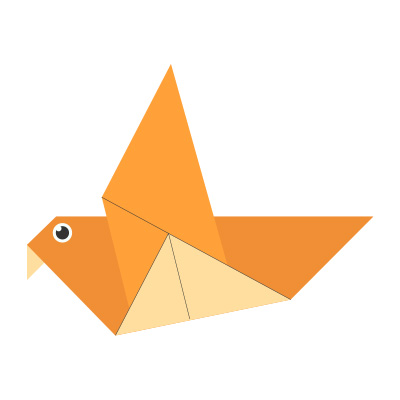
Origami Paper Australian Parakeet Easy 13 Step by Step
If you’re looking for a fun and creative way to spend your afternoon, why not try folding an Australian parakeet using origami paper? Known for their vibrant feathers and lively nature, Australian parakeets are a beautiful subject to recreate with the ancient Japanese art of paper folding. In this guide, you’ll discover an easy 13 step by step method to make your own origami parakeet using just a square sheet of paper and your hands.
Whether you’re a beginner or an experienced origamist, this tutorial will walk you through each fold with clarity and simplicity. Let’s bring this colorful bird to life, one fold at a time!
Why Choose an Australian Parakeet for Origami?
The Australian parakeet, especially the budgerigar (often called a budgie), is a perfect inspiration for origami due to its compact shape, charming features, and iconic tail feathers. These birds are a symbol of joy and playfulness, making them ideal for craft projects.
Origami not only enhances concentration and motor skills but also allows for creativity and personal expression. Folding a paper parakeet can be a great way to unwind, decorate your space, or even teach kids about wildlife in a fun and engaging way.
Materials You’ll Need
Before we begin our 13-step origami Australian parakeet, gather these materials:
- 1 square sheet of origami paper (preferably double-sided and colorful)
- A flat folding surface
- Optional: black marker for eyes
Tip: Use a green or blue origami paper with a yellow or white side to closely mimic the look of a real Australian parakeet.
Origami Art and Craft Materials on Amazon
Easy 13 Step by Step Instructions
Follow these simple steps to fold your very own origami parakeet:
Step 1: Start with the Colored Side Down
Place the square paper on the table with the colored side facing down. This helps the bird’s body appear in the desired color.
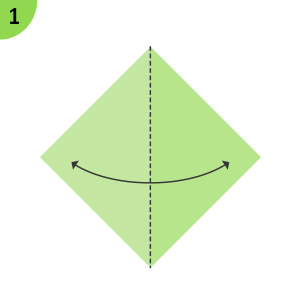
Step 2: Fold Diagonally in Half
Fold the paper diagonally from one corner to the opposite corner. Crease well and unfold. Repeat for the other diagonal. You’ll see an “X” crease across your paper.
Step 3: Fold in Half Horizontally and Vertically
Now fold the paper in half edge-to-edge (not corner-to-corner), horizontally and vertically. Crease sharply and unfold again. Your paper now has a grid-like crease pattern.
Step 4: Collapse into a Preliminary Base
Pinch the creases together so the paper collapses into a smaller square (called the preliminary base or square base). This is a common starting point in many origami animals.
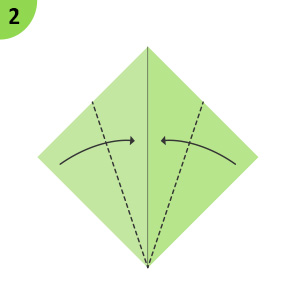
Step 5: Form the Bird Base
Lift one flap of the square base and fold its sides to the center crease to form a kite shape. Flatten the triangle on top. Repeat this for the remaining three flaps.
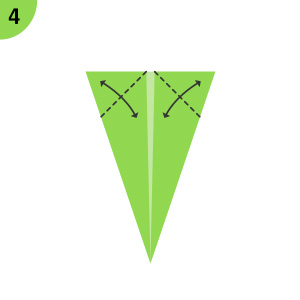
Step 6: Create the Head Flap
Choose one flap to be the head. Fold the top layer’s corner downward at a 45° angle to form the head. Adjust based on how large or small you want the head to look.
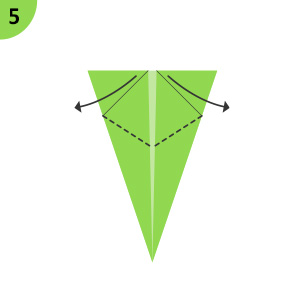
Step 7: Narrow the Body
Fold both side edges of the body toward the centerline. This step gives your parakeet a slimmer, more realistic bird shape.
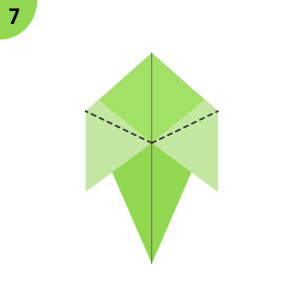
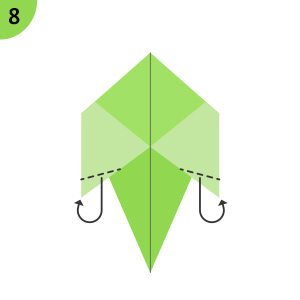
Step 8: Form the Tail
Take the bottom point and gently pull it downward and outward. This will be your parakeet’s tail. You can angle it slightly for a more natural look.
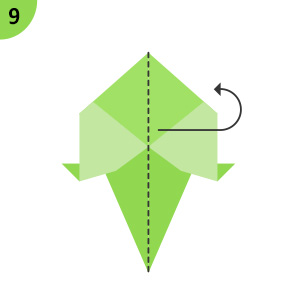
Step 9: Shape the Beak
Now that the head flap is in place, fold a small tip of it backward to create a beak. A tiny fold is enough to suggest the beak of the parakeet.
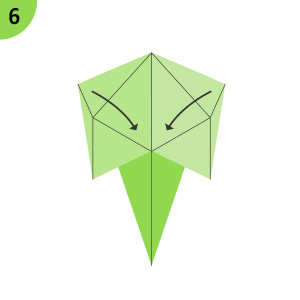
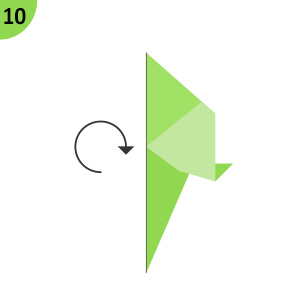
Step 10: Add Wings
Fold the side flaps outward and slightly upward to form wings. You can shape them by curling or folding slightly for motion and depth.
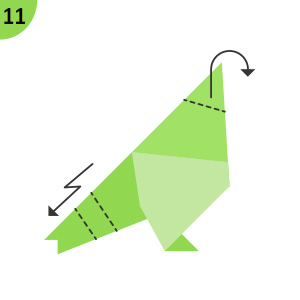
Step 11: Lock the Layers
Press all layers gently to reinforce the creases and lock the folds in place. This ensures the structure holds together well.
Step 12: Stand It Up
Gently open the bottom part so your origami parakeet can stand upright. Flatten the base slightly if needed.
Step 13: Add Final Touches
Use a fine-tipped black marker to draw eyes or feather patterns. Optional: color the tail tip or wings for more vibrancy.

Tips for Better Origami Results
- Use thinner paper: Thinner origami paper folds more cleanly and helps with detailed steps like the beak and wings.
- Practice folds before finalizing: Do a trial run with scrap paper if you’re unsure.
- Decorate with markers or paint: Add realism with subtle colors or patterns on the feathers and tail.
Displaying Your Origami Parakeet
Your finished paper parakeet can be a charming decoration for:
- Kids’ rooms
- Office desks
- Birthday party centerpieces
- Classroom projects
You can also attach a string and hang it from the ceiling or make a mobile using multiple birds in different colors.
Frequently Asked Questions (FAQs)
Q: Can kids do this origami parakeet project?
Yes! The steps are beginner-friendly, though younger children might need some adult help for creasing and shaping details.
Q: What size paper should I use?
A 15×15 cm (6×6 inch) square is ideal. Larger paper is easier for beginners; smaller paper is more challenging but looks more delicate.
Q: Can I use regular paper instead of origami paper?
Absolutely. Just cut regular paper into a square. However, origami paper folds easier and gives cleaner lines.
Final Thoughts
Creating an origami paper Australian parakeet in 13 easy step-by-step instructions is a fulfilling craft that blends creativity, patience, and fun. Whether for personal joy or a classroom activity, this simple bird-folding project brings joy and color to any space.
Try folding one today, and maybe even a whole flock tomorrow!
SEO Keywords Included:
- origami paper australian parakeet
- easy origami bird steps
- 13 step by step origami guide
- how to make an origami parakeet
- beginner bird origami
- paper parakeet instructions