
How To Make An Easy Origami Paper Cat 7 Step by Step Instructions
Origami, the traditional Japanese art of paper folding, is a fun and relaxing hobby that’s perfect for kids and adults alike. One of the most popular beginner-friendly projects is the origami paper cat. Whether you’re looking to entertain children, decorate a card, or just unwind with a creative task, this adorable cat will charm you with its simplicity.
In this guide, we’ll show you how to make an easy origami paper cat in 7 step-by-step instructions. You don’t need any prior experience, just a square piece of paper and a few minutes of your time.
Why Try Origami?
Before we jump into the tutorial, let’s explore why origami is a fantastic creative activity:
- Stress-relieving: Folding paper helps focus the mind and ease tension.
- Boosts creativity: Origami enhances spatial awareness and imagination.
- Inexpensive fun: All you need is paper!
- Educational: Origami teaches patience, geometry, and precision.
- Perfect for kids: It’s safe, screen-free entertainment that develops fine motor skills.
Materials You’ll Need
To make your own easy origami paper cat, gather the following:
- 1 square sheet of paper (preferably origami paper, but any paper will do)
- Markers or pens (optional, for drawing the face)
- Flat surface for folding
Tip: If you don’t have a square sheet, just take a standard piece of paper and cut it into a square before starting.
Origami Art and Craft Materials on Amazon
How To Make An Easy Origami Paper Cat 7 Step by Step
Now, let’s get into the step-by-step folding instructions. Follow closely, and in just a few minutes, you’ll have a cute paper cat in your hands.
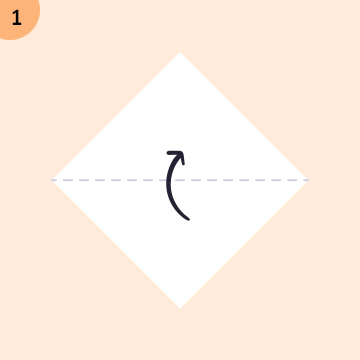
Step 1: Fold the Paper Diagonally
Begin with the square paper colored side down (if you’re using colored origami paper).
- Fold the paper diagonally from the top left to bottom right to form a triangle.
- Crease well, then unfold.
- Now fold from top right to bottom left and crease again.
These creases will form an “X” that helps guide your next folds.
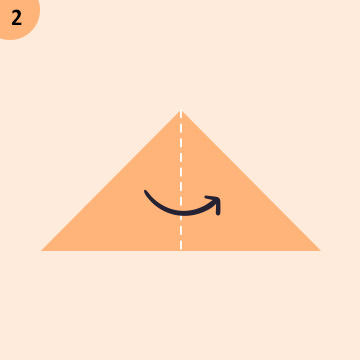
Step 2: Fold Into a Triangle
Now, fold the paper in half horizontally, bringing the top edge to the bottom edge. This creates a large triangle.
Make sure the open end (where the two corners can flap) is at the top, and the folded edge is at the bottom.
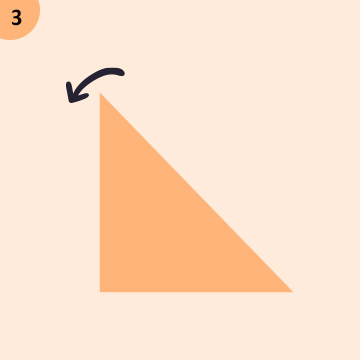
Step 3: Create the Ears
This step is where the magic begins!
- Take the left corner of the triangle and fold it upwards at an angle to form a cat’s ear.
- Repeat with the right corner, folding it up to match the left side.
You should now have a shape that looks like a cat’s head with two pointy ears.
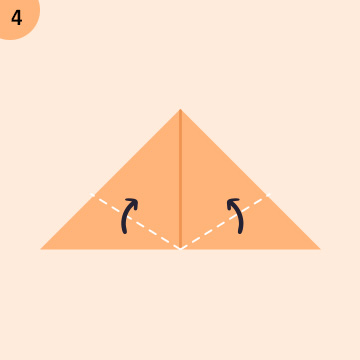
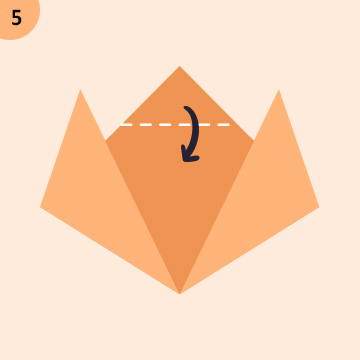
Step 4: Fold the Bottom Point Up
Now, take the bottom point of the triangle (center) and fold it up slightly, about an inch. This will help round off the bottom of the cat’s face and make it look more realistic.
Crease it well so it stays in place.
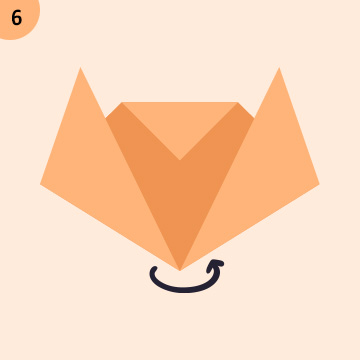
Step 5: Flip It Over
Gently flip the entire paper over to the other side. You’ll now see a neater version of your cat’s head from the front.
If the folds are aligned well, you should see a symmetrical face with two ears.
Step 6: Draw the Face
Time to bring your origami cat to life!
- Use a marker or pen to draw two eyes.
- Add a small triangle for the nose.
- Draw a mouth and some whiskers if you’d like.
Feel free to get creative here, make a happy cat, sleepy cat, or even a silly cat!
Step 7: Customize and Display
Congratulations! You’ve now made your very own easy origami paper cat.
You can now:
- Stick it on your notebook or card
- Make several in different colors
- Add a small body by attaching it to another folded paper
- Use it as a bookmark
- Hang them as decorations
The possibilities are endless!

Bonus Tips for Better Origami Cats
- Use thinner paper for easier folding and crisper results.
- If you want a 3D look, lightly puff up the ears or curve the folds a bit.
- Make a family of cats in different sizes by using paper squares of various dimensions.
- Practice symmetry, neat folds are the key to great-looking origami.
Why Kids Love This Origami Cat
This paper cat design is especially popular with kids because:
- It’s simple and quick.
- They can decorate it with colors, stickers, or glitter.
- It sparks imaginative play (some even make cat families or comic strips).
- It’s easy to teach and share with friends.
Teachers and parents can use it as a craft activity during art lessons, birthday parties, or rainy days.
SEO Summary
If you’re searching for how to make an easy origami paper cat 7 step by step, this guide has everything you need. With clear instructions, simple folds, and fun decoration ideas, you’ll be folding adorable cats in no time. Ideal for beginners, kids, and anyone looking for a creative break, this origami project requires no special tools, just paper and a little imagination.
Final Thoughts
Origami is a timeless art that brings joy through simplicity, and this easy paper cat is a perfect example. Whether you’re making it for fun, school, or as a stress-relief activity, the process of folding and creating is deeply satisfying.
Try making a few origami cats today and explore the world of paper animals. You might just find a new hobby that brings peace and creativity into your daily routine.


