
How To Make An Easy Origami Pig Face: 10 Step-by-Step Instructions
Origami is a fun and rewarding craft that can be enjoyed by all ages. Whether you’re a beginner or just looking for a quick, creative activity, making an origami pig face is a great project. In this tutorial, we’ll guide you step by step on how to make an easy origami pig face using just one piece of paper. No scissors, glue, or complicated folds needed!
Why Make an Origami Pig Face?
Origami animals are not only adorable but also serve as a great way to build patience, improve concentration, and develop fine motor skills. A paper pig face is especially cute and makes a perfect addition to cards, classroom crafts, or even as a fun table decoration.
Let’s jump into this 10-step origami pig face tutorial!
What You’ll Need
- 1 square piece of paper (preferably pink)
- A flat surface to fold on
- A marker (optional, for eyes and nostrils)
Origami Art and Craft Materials on Amazon
Step-by-Step Instructions: How to Make an Easy Origami Pig Face
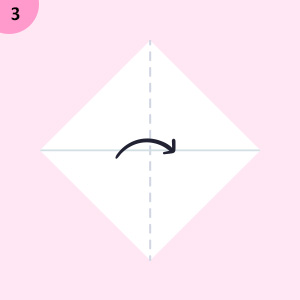
Step 1: Start with a Square Paper
Begin with the colored side facing down. A 6×6 inch piece of origami paper works best, but any square sheet will do.
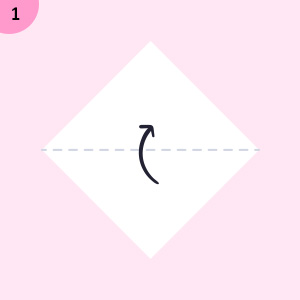
Step 2: Fold Diagonally
Fold the paper in half diagonally to make a triangle. Crease well and unfold. Then fold the opposite corners to make another diagonal crease. This helps in lining up the next folds.
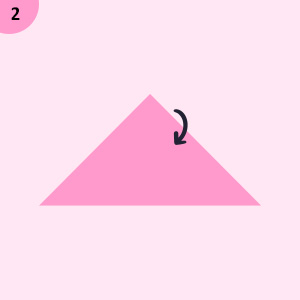
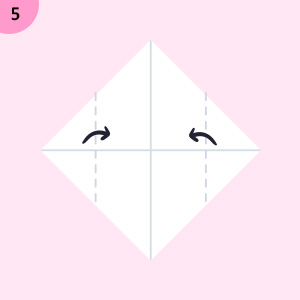
Step 3: Form a Triangle
Now fold the paper in half diagonally again and keep it folded into a triangle.
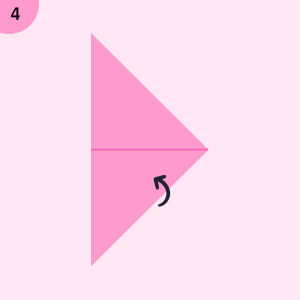
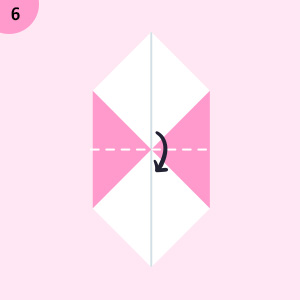
Step 4: Create the Pig’s Ears
With the triangle’s point facing up, fold both corners on the base of the triangle upwards toward the top point. These will form the pig’s ears. Make sure they are symmetrical.
Step 5: Shape the Pig Face
Fold the bottom point of the triangle slightly upward (about 1 inch or so). This will round out the pig’s chin and give the face more shape.
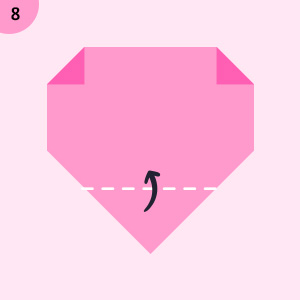
Step 6: Flatten and Adjust
Crease all folds neatly and flatten the entire pig face. Make sure the ears stay lifted slightly to give the face character.
Step 7: Draw Eyes
Use a marker or pen to draw two small circles for eyes on the flat part of the face, just below the ears.

Step 8: Draw the Nose
Draw a small oval or rectangle in the middle of the lower face area. Then add two small dots inside to represent the nostrils.
Step 9: Add Details (Optional)
Add cute blush marks, a smile, or even eyelashes if you want to personalize your pig face.

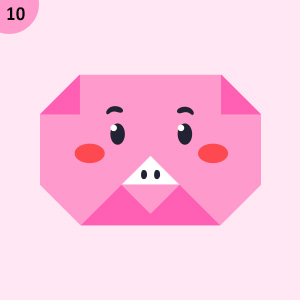
Step 10: Display or Share
Your origami pig face is now complete! You can attach it to a card, hang it on the wall, or give it as a handmade gift.
Origami Tips for Beginners
- Always crease folds firmly for cleaner lines.
- If you’re new to origami, practice with a larger paper.
- Don’t worry if your first try isn’t perfect, origami improves with practice.
- Colored or double-sided paper adds a fun, finished look.
Creative Uses for Your Origami Pig Face
- Classroom Projects – A great craft for animal-themed lessons.
- Birthday Decorations – Perfect for a farm-themed party.
- Scrapbooking – Add a handmade touch to your pages.
- Bookmarks – Tape the back to a corner to mark pages.
- Gift Tags – Write a message on the back for a unique touch.
Final Thoughts
Making an easy origami pig face is a fantastic way to combine creativity and relaxation. In just 10 simple steps, you can fold a delightful paper pig that’s full of personality. Whether you’re folding with kids or just enjoying some DIY downtime, this project is quick, fun, and highly satisfying.
Don’t forget to share your origami pig faces online! Tag your creations with #OrigamiPigFace and join a global community of paper artists.
SEO Keywords Included:
- how to make an easy origami pig face
- origami pig face step by step
- easy origami animal face
- beginner origami instructions
- DIY pig face paper folding
- origami for kids pig


