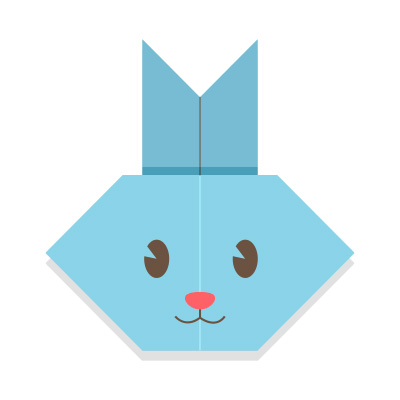
How To Make An Easy Origami Rabbit Face: 7 Step-by-Step Instructions
Origami, the ancient Japanese art of paper folding, is a fun, creative, and relaxing activity enjoyed by children and adults alike. Among the many origami designs, animal faces, especially a rabbit face, are a favorite due to their simplicity and charm. In this guide, you’ll learn how to make an easy origami rabbit face in 7 simple steps, even if you’re a complete beginner.
Whether you’re crafting for fun, decorating greeting cards, or teaching kids basic paper-folding skills, this step-by-step tutorial will help you create a cute rabbit face with just a square piece of paper.
Why Choose Origami Rabbit Face for Beginners?
The origami rabbit face is a fantastic beginner-friendly project. It requires no scissors, glue, or complicated folds. All you need is a single square sheet of paper and a few minutes of your time. It’s perfect for classroom activities, Easter decorations, or creative playtime with kids.
Some key benefits include:
- Boosts fine motor skills
- Encourages patience and focus
- Provides a sense of accomplishment
- Fun and educational for all ages
What You’ll Need
Before we dive into the steps, gather the following:
- 1 square sheet of origami paper (any size or color)
- Black marker or pen (for adding facial features)
- Optional: Googly eyes or stickers for decoration
Origami Art and Craft Materials on Amazon
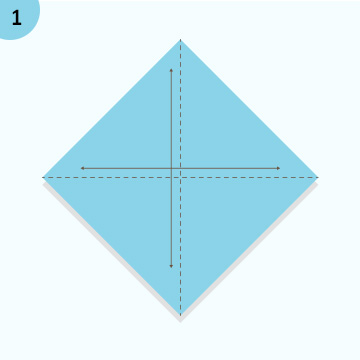
Step 1: Start With the Paper in a Diamond Position
Place your square sheet of paper on a flat surface like a table or desk. Position it so it looks like a diamond, with one corner pointing toward you.
Tip: If your paper has a white side and a colored side, begin with the colored side facing down.
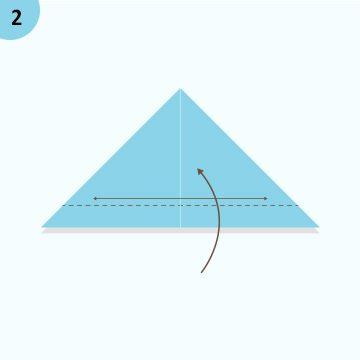
Step 2: Fold the Paper in Half Diagonally
Take the bottom corner of the diamond and fold it up to meet the top corner. This creates a triangle shape. Press the crease firmly and make sure the edges align perfectly.
This first fold forms the basic shape of the rabbit’s head.
Step 3: Fold the Right Corner Upward
Next, take the right corner of the triangle and fold it upward to form a long ear. The tip of the ear should point slightly to the upper left.
Pro Tip: The ear shape adds personality, so feel free to adjust the angle for a unique look.
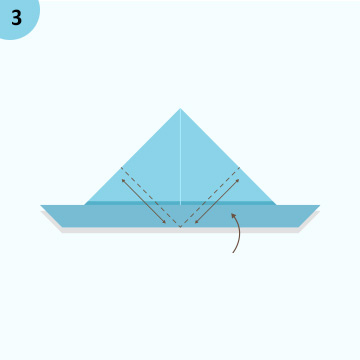
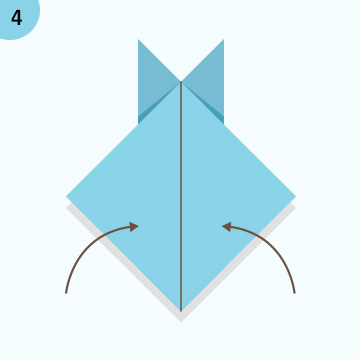
Step 4: Fold the Left Corner Upward
Now repeat the process on the left side. Fold the left corner upward so it mirrors the right ear.
You now have a triangular base with two “ears” sticking up, the rabbit face is beginning to take shape!
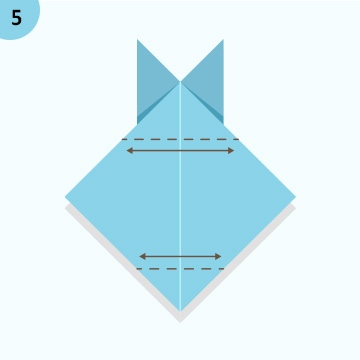
Step 5: Fold Down the Top Tip
To create a rounded head, take the top point of the triangle and fold it downward just a little. This makes the top of the rabbit’s head look softer and more rounded.
This small fold also adds a 3D effect to your origami design.
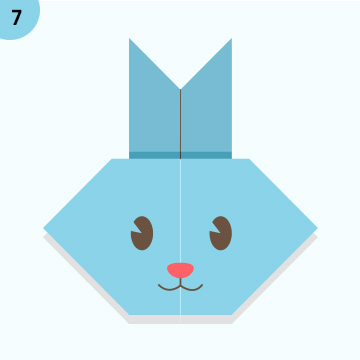
Step 6: Add the Face Details
Use a black pen or marker to draw the eyes, nose, and mouth. Get creative with expressions — make a happy bunny, a sleepy bunny, or even a surprised bunny!
You can also glue googly eyes or use small stickers to add a fun twist.
Suggested facial features to draw:
- Two oval eyes
- A small upside-down triangle for the nose
- A “W” shape for the mouth
- Optional: Whiskers on each side of the face
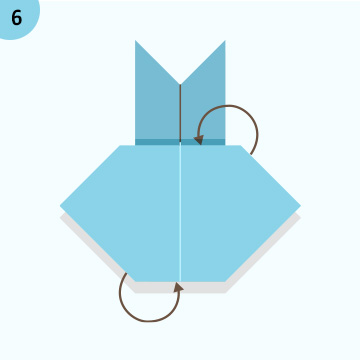
Step 7: Flip and Flatten
Finally, turn the origami rabbit face over and gently flatten it with your palm. This helps the folds hold their shape better. Your cute rabbit face is now complete and ready to display or gift!
Creative Ideas for Using Origami Rabbit Faces
Now that you’ve made your adorable paper bunny, here are some creative ways to use it:
- Easter Decorations – Tape them onto string for a bunny bunting.
- Greeting Cards – Glue the rabbit face onto a card for a handmade touch.
- Bookmarks – Laminate and clip the corner to use as a bookmark.
- Classroom Crafts – Great for teachers during spring or animal-themed lessons.
- Gift Tags – Write a message on the back and attach it to presents.
Tips for Better Origami Results
Even though this is a simple project, here are a few helpful tips for getting the best results:
- Use origami paper – It’s thin and folds cleanly without tearing.
- Make sharp creases – Use your fingernail or a ruler edge to press down folds.
- Be patient – Don’t rush; precise folds lead to better-looking designs.
- Practice – The more you fold, the better your skills will become.
Common Mistakes to Avoid
While the process is easy, beginners might encounter these common issues:
- Misaligned edges – Always double-check alignment before creasing.
- Weak creases – If the folds aren’t crisp, the shape may not hold.
- Too thick paper – Cardstock or thick paper is harder to fold and can result in poor shapes.
Stick with standard origami or printer paper for the best outcome.
Final Thoughts
Creating an origami rabbit face is a delightful and educational activity for crafters of all ages. With just a square piece of paper and 7 simple steps, you can bring a bunny to life in minutes. It’s a great project for holidays like Easter, animal-themed parties, or just a fun way to pass the time.
Once you master this origami bunny, why not try other animals like a cat, dog, or panda? Origami offers endless possibilities, and it all starts with one simple fold.


