
How to Fold an Easy Origami Whale – 7 Step-by-Step Instructions
Origami, the traditional Japanese art of paper folding, offers a fun and relaxing way to create animals, shapes, and designs using just a single sheet of paper. One of the easiest and most popular origami animals for beginners is the origami whale. Whether you’re a teacher looking for a craft activity, a parent entertaining kids, or a hobbyist exploring paper art, learning how to fold an easy origami whale can be both rewarding and fun.
In this guide, you’ll discover how to fold an easy origami whale in just 7 step-by-step instructions. All you need is a square sheet of paper and a few minutes of focus!
Why Make an Origami Whale?
Before we dive into the folding process, here’s why this project is worth your time:
- Beginner-friendly: Ideal for kids and adults with no origami experience.
- Minimal materials: Requires only one square piece of paper.
- Educational: Encourages focus, creativity, and fine motor skills.
- Fun decoration: Can be used for ocean-themed projects, bookmarks, or wall art.
Now, let’s dive into the ocean of creativity with this simple origami whale.
Materials You’ll Need
To fold your origami whale, make sure you have:
- One square sheet of origami paper (any size will do; 6×6 inches is perfect for beginners).
- A flat surface to work on.
- Optional: A black pen or marker to draw the eyes once completed.
Origami Art and Craft Materials on Amazon
How to Fold an Easy Origami Whale – Step-by-Step Instructions
Follow these 7 simple steps to create your very own paper whale.
Step 1: Start with a Square Paper
Begin with your square sheet of paper colored side down (if the paper has a color or pattern). This will ensure that the colored side ends up on the outside when the whale is finished.
Tip: If you’re using plain white printer paper, you can cut it into a square by folding one corner diagonally to the opposite edge and trimming off the excess strip.
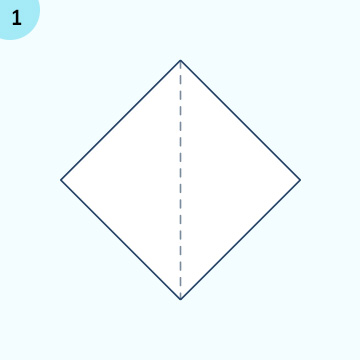
Step 2: Fold Diagonally in Half
Take the bottom-left corner of the square and fold it up to meet the top-right corner. This will create a triangle. Crease the fold well and then unfold it.
Repeat with the other diagonal, fold the bottom-right corner to the top-left. Again, crease and unfold. These two folds will give you guidelines for the next steps.
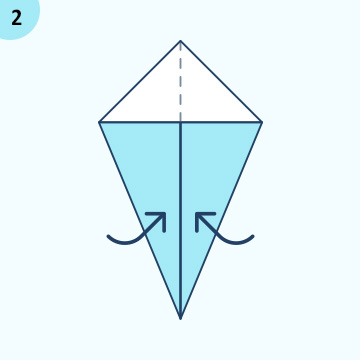
Step 3: Fold Vertically in Half
Fold the paper vertically in half, bringing the right side over to the left side. You now have a rectangle. Make a strong crease and leave this fold in place.
This creates the basic body fold that you’ll shape into the whale’s body.
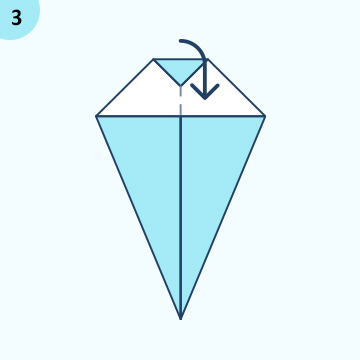
Step 4: Form the Whale’s Nose
Now it’s time to make the whale’s front end (the nose). With the folded edge at the top, fold the top right corner diagonally down so that it aligns with the bottom edge of the rectangle. This forms a triangle on the right side, shaping the whale’s nose.
Crease firmly and leave it folded.
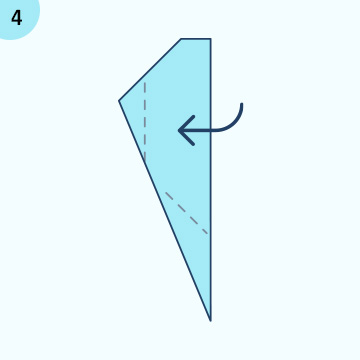
Step 5: Create the Whale’s Tail
To form the tail, focus on the left side of the rectangle. Take the bottom-left corner and fold it diagonally upward, aligning it with the top edge. This creates one half of the tail.
Next, fold the top-left corner diagonally downward to meet the bottom edge. You should now see a symmetrical tail forming.
These two triangle folds on the left side of the paper make up the whale’s signature forked tail.
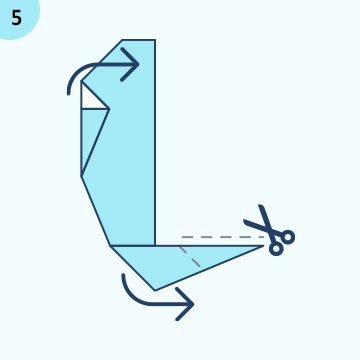
Step 6: Add the Whale’s Fin
Optional but fun: You can create a small fin by folding a tiny triangle along the bottom of the body (center area). Just lift a small flap from the bottom layer and fold it upward slightly.
This adds a bit of character to your origami whale.
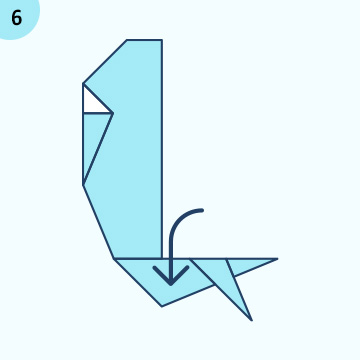
Step 7: Add Details and Complete Your Whale
Turn the origami over so the folds are hidden underneath. You’ll now see the full shape of a whale, body in the middle, nose on the right, tail on the left.
Use a black pen or marker to draw a simple round eye on the head section.
Congratulations! You’ve just folded a simple origami whale in 7 easy steps.

Creative Ideas for Your Origami Whale
Now that you’ve completed your whale, here are a few creative ways to use it:
- Classroom decoration: Hang a collection of origami whales on a string for an under-the-sea theme.
- Bookmarks: Use a smaller piece of paper to create tiny whales that can double as adorable page markers.
- Greeting cards: Glue your origami whale onto a card and add ocean-themed designs for a handmade touch.
- Ocean diorama: Combine your whale with other origami sea creatures like fish, turtles, or jellyfish.
Tips for Origami Beginners
If you’re new to origami, don’t worry if it doesn’t look perfect the first time. Here are a few beginner-friendly tips:
- Use thinner paper: It’s easier to fold and manage than thick or textured paper.
- Make sharp creases: Use your fingernail or the edge of a ruler to press folds firmly.
- Practice with scrap paper: Before using fancy origami paper, try with regular paper to build confidence.
- Follow instructions slowly: Take your time with each step to ensure accuracy.
Final Thoughts
Folding an origami whale is a great way to introduce yourself or others to the art of paper folding. With just 7 step-by-step instructions, you can turn a simple square of paper into a charming sea creature. Whether you’re doing this for fun, education, or decoration, origami is a relaxing and satisfying hobby that anyone can enjoy.
So grab your paper, follow the steps, and bring your origami whale to life!
SEO Summary
- Target keyword: how to fold an easy origami whale
- Related keywords: origami whale instructions, step-by-step origami, easy origami for beginners, how to make a paper whale, origami animal folding
- Meta description: Learn how to fold an easy origami whale with these 7 step-by-step instructions. Perfect for beginners, kids, and craft lovers. No scissors or glue needed!


